 Photo credit IStock Photo.
Introduction
 Photo credit IStock Photo.
The Vacuum Infusion Process (VIP) is a technique that uses vacuum pressure to drive resin into a laminate. Dry materials are laid into the mold and the vacuum is applied before resin is introduced. Once a complete vacuum is achieved, resin is literally sucked into the laminate via carefully placed tubing. This process is aided by an assortment of supplies and materials.
In a typical hand lay-up, reinforcements are laid into a mold and manually wet out using brushes, rollers, or through other means. An improvement on that method is to use a vacuum bag to suck excess resin out of the laminate. Vacuum bagging greatly improves the fiber-to-resin ratio, and results in a stronger and lighter product. If you are unfamiliar with vacuum bagging, we recommend reading our guide, Vacuum Bagging Equipment and Techniques for Room-Temperature Applications, as VIP requires experience in this area and uses many of the same principles. Vacuum infusion builds upon these principles, providing further improvements to the lamination process.
Benefits of Vacuum Infusion
Vacuum infusion provides a number of improvements over traditionally vacuum bagged parts. These benefits include:
-
Better fiber-to-resin ratio
-
Less wasted resin
-
Very consistent resin usage
-
Unlimited set-up time
-
Cleaner
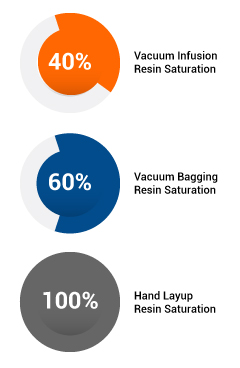 Photo credit IStock Photo.
VIP offers a better fiber-to-resin ratio than vacuum bagging. A typical hand lay-up usually results in excess of 100% fabric weight by resin. Resin alone is very brittle, so any excess will actually weaken the part. Vacuum bagging can reduce this number significantly; however, it is still not ideal and can lead to additional problems.
While vacuum bagging certainly improves on the hand lay-up, there is still a hand lay-up involved. Because of this, the laminate will always begin in an oversaturated state. Vacuum pressure will remove much of the excess resin, but the amount removed still depends on the variety of variables. This includes reinforcement material, resin, time factors, as well as others.
Vacuum infusion takes a different approach, in that a vacuum is drawn while the materials are still dry. From that point, resin is infused using vacuum pressure. Rather than starting with excess and drawing resin out, VIP starts with none and pushes resin in. Ideally, any excess resin that is introduced will eventually be sucked out into the vacuum line. As a result, only the minimum amount of resin is introduced. This lowers weight, increases strength, and maximizes the properties of fiber and resin. Parts constructed using VIP can approach prepreg levels of resin content.
Due to the nature of VIP, resin usage becomes very predictable. While a standard lay-up varies in resin content due to the human variable, VIP is remarkably consistent. Even when creating a large product, resin usage will be predictably similar upon repeated attempts. This results in less wasted resin, and more importantly, less wasted money.
Vacuum infusion provides another valuable benefit: time. A frequent problem that can arise in vacuum bagging is the time factor. Many resins have a pot-life of about 30 minutes, though there are certainly some (such as our System 4500 Infusion Epoxy Resin or System 4600 High Temp Infusion Epoxy Resin) that offer work times of up to 90 minutes. Even so, that time limit is extremely critical in vacuum bagging applications. Large projects can easily approach the 2-hour mark, and even small, seemingly simple projects can quickly turn frantic when a pesky leak in the vacuum seal cannot be found. Also, depending on when the bag is applied, the amount of resin removed can vary from part to part.
Vacuum infusion, however, offers unlimited set-up time. Because the vacuum is applied while reinforcements are still dry, there is no resin clock to work against. After the bag is applied, leaks can be patiently sought out. If something is not sitting properly, simply release vacuum and readjust. No time constraints are introduced until it is decided that it is time to infuse the resin. Until that moment, changes can be made again and again.
Finally, vacuum infusion is a much cleaner process. There are no brushes or rollers, and therefore no splashing or spattering. No one will be required to hover over an open mold, saturating a laminate by hand, trying not to drip on themselves. In addition, there are less resin fumes to contend with. Because the only fumes radiate from the resin reservoir, they are somewhat containable. VIP provides a cleaner, safer, and friendlier work environment, though it is still important to work in a well-ventilated area and wear a respirator and other appropriate safety equipment.
Potential Pitfalls
Like any laminating process, VIP is not without its drawbacks. When attempting infusion for the first time, it is important to keep the following ideas in mind.
-
Complicated Set-up
-
Easy to ruin a part
-
Trial and error
Though set-up is time-limit free, it is somewhat more complicated. Vacuum bagging requires the placement of only the vacuum tubing. Vacuum infusion requires not only vacuum tubes but resin inlets as well, not to mention in-bag extensions of these tubes. Placement of these vacuum and resin lines varies from part to part, and there is no one way to set them up. These considerations must be evaluated prior to lay-up, or else the part could be ruined.
This leads into the next pitfall; it is very easy to destroy a part. Typically, once infusion begins, there is little that can be done to correct any errors. For example, if a leak were to occur, even the smallest amount of air introduced could be potentially fatal to a part. It would probably result in resin pooling, under-saturation, or even a complete stoppage of resin flow. Though there are certainly some cases where problems can be corrected, it should not be expected. The best protection from disaster is careful planning.
Due to the complexity and ease of error, VIP should be viewed as a trial-and-error process. The best mindset to have when attempting vacuum infusion for the first time is that a few parts (or more than a few) will be ruined before getting it right. The trick is to carefully document each attempt in order to learn from each trial. Keep track of the resin flow rates. Determine where the resin is reluctant to go and find a way to get it there. Even the smallest modifications can yield drastically different results. Practice with small quantities and inexpensive materials before undertaking full-scale projects. The key is learning from mistakes. This is especially the case when working with larger projects requiring multiple vacuum and resin lines. In a manufacturing environment, it is recommended that at least 6 months are set aside for testing and preparation.
VIP Set-up and Equipment
When preparing to experiment with infusion, it is important to understand some general concepts about how materials are used and arranged. Keep in mind that every project is unique, and this guide is not intended to provide the only available options. We will discuss some variations later.
First, the general sequence of events that comprises vacuum infusion is illustrated in the following diagram.
 Photo credit IStock Photo.
For the purpose of this guide, we will be focusing on one general set-up idea with the notion that resin will be infused into a center point in the laminate. From there, resin will be pulled outward via vacuum pressure. The final arrangement of materials should look something like this.
 Photo credit IStock Photo.
Note: For the purposes of this diagram, the vacuum bag itself is not shown. With this final goal in mind, let's take a closer, step-by-step look at what materials are used and how to go about using them.
Vacuum Infusion Product Examples
| Item |
Description |
|
| Vacuum Pumps |
The first step in any successful vacuum infusion process will be in creating your vacuum pressure. Fibre Glast carries an assortment of vacuum pumps to meet the needs of any fabricators project. |

|
| Vacuum Tubing |
Vinyl tubing is strong enough to resist collapse under pressure during your vacuum cycle, with its 1/2" inner diameter allowing for maximum flow during your vacuum infusion application. |
|
| Resin Trap |
Resin traps are placed in-line in order to catch excess resin, which could seriously harm of even destroy your vacuum pump. For larger projects, multiple resin traps are recommended. |
|
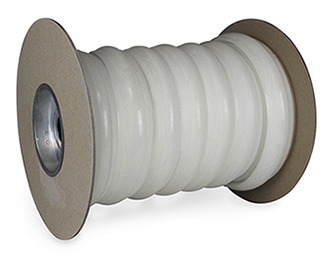
| Spiral Tubing |
Spiral tubing is a resin infusion standard, and is ideally suited for in-bag for vacuum line extenders or resin feed lines. |
|
Step One: The Mold
Prepare Your Mold
Like any lamination process, a good quality mold is required for vacuum infusion. The mold should be rigid and have a high-gloss finish. Ideally, this mold will have flange of at least six inches to be used for the placement of sealant tape and spiral tubing. After the mold is properly cleaned, apply your ordinary, preferred mold release agent. Unique mold releases are not required for resin infusion.
Select Your Reinforcement
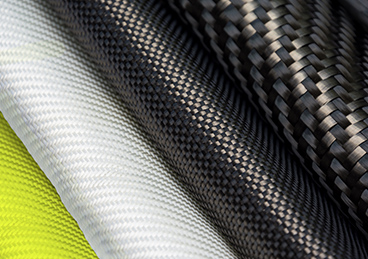
Choosing reinforcement is an important decision for any laminate, but there are additional considerations when choosing one for infusion. While all fabrics will potentially infuse, different materials and weave styles can severely alter resin flow rates. The following offers some general guidelines for choosing materials, though individual experiences may vary.
| Item |
Description |
|
| Fiberglass |
Fiberglass is the most frequently used reinforcement in vacuum infusion. Most fiberglass fabrics offer high permeability, allowing resin to easily flow through. In general, looser weaves tend to infuse better, as there is less crimping of strands. |
|
| Continuous Strand Mat |
When using non-woven mats, continuous strand mat will offer superior infusion over a chopped-strand. While both offer high permeability, the binder in chopped strand mat somewhat hinders resin flow. Continuous strand mat will avoid problem. |
|
| Carbon Fiber |
Carbon fiber tends to infuse more slowly, when compared to other fabrics. To counteract this, the addition of a flow media has been found to greatly increase infusion rates. |
|
| Kevlar |
Like carbon fiber, Kevlar has a slower infusion time when compared to fiberglass. Be sure to choose a flow media in order to rectify this. It is a good idea to experiment with these materials beforehand in order to properly gauge flow rates. |
|
 Photo credit IStock Photo.
When working with molds of a more complex shape, dry reinforcement may not readily sit flat. Super 77 Spray Adhesive (#1404) is recommended to remedy this problem. Spray a light layer of adhesive on the mold surface and lay down the reinforcement. This should provide enough adhesion to hold the materials in place. When used moderately, Super 77 will not interfere with the resin infusion or curing process.
Select Your flow media and/or core material
Flow Media
A concept unique to vacuum infusion is the idea of flow media. In VIP, resin enters the laminate at a fixed point (or points) and must be directed. Resin will always travel in the path of least resistance. Unfortunately, many reinforcements can provide a great deal of resistance that can prevent resin flow. Aiding the flow of resin is the job of flow media.
Although it is possible to infuse resin into a reinforcement without the addition of flow media, it is rarely successful. The flow media is typically laid as a single layer between reinforcement layers to provide an easy flow conduit for resin. This material ultimately becomes part of the laminate.
Flow Media Products
| Item |
Description |
|
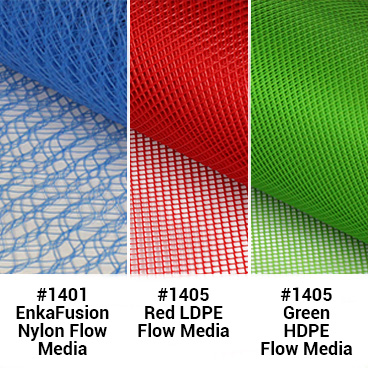
| EnkaFusion Nylon Flow Media |
EnkaFusion is constructed from randomly oriented, entangled nylon filaments that will typically provide the fastest infusion times. |
|
| Green HDPE Infusion Flow Media |
Green HDPE Infusion Flow Media is designed to facilitate resin flow that is quick, controlled, and predictable for resin infusion projects up to 90 square feet. |
|
| Red LDPE Infusion Flow Media |
Red LDPE Infusion Flow Media is designed to facilitate a controlled, predictable flow of resin for smaller resin infusion projects up to 50 square feet. |
|
| Lantor Soric XF |
Lantor Soric has hexagonal flow channels that will quickly move resin throughout the laminate, while simultaneously adding thickness. This flow media will provide you maximum conformability for your project. |
|
| DIVINYMAT |
DIVINYMAT is similar to traditional vinyl foam cores, but includes groves, perforations, and scores in the core material to help resin traverse the laminate while adding strength and rigidity. It can serve as both a flow media and structural core. |
|
Step Two: Resin and Vacuum Lines
Before the vacuum bag is closed, careful consideration must be taken in order to set up resin and vacuum lines
Select and Install Your Resin Feed Lines
Resin will be fed from a standing source (usually a bucket.) The line for getting the resin into the laminate will have to be installed before closing the bag. Although the same tubing that is used for applying vacuum is fine for getting the resin to the bag, after the resin is being directed through the laminate there are some materials unique to VIP which can help direct the resin flow.
Resin Flow Products
| Item |
Description |
|
| EnkaFusion Filter Jacket |
Enkafusion Filter Jacket is a unique flow media that permits a wider path for resin dispersion over the entire surface, resulting in a more even resin dispersion. |
|
| Spiral Tubing |
Spiral tubing is a resin infusion standard that is ideally suited for in-bag vacuum line extenders or resin feed lines. |
|
| Omega Flow Channel |
Omega Flow Channel is a reusable resin infusion line made of translucent silicone rubber. These flow lines leave minimal or no mark off when used in conjunction with our flow media and peel ply. |
|
EnkaFusion Filter Jacket (#1400) is used in nearly all VIP projects. This material will be used on top of the laminate and removed from the laminate when pulling the part from the mold. It will also provide the removable material which can be used for anchoring your T-fittings which will connect your resin and vacuum lines.
EnkaFusion Filter Jacket is a 4" wide resin flow channel which is typically laid out over the length of the laminate. It is similar to the nylon matting except that it's narrower and is contained within a fabric "sock." The design of this "sock" holds resin until the entire length is filled. At that point, resin begins to flow outward through the sock and into the laminate, providing consistent flow rates across a long span. This style of EnkaFusion is particularly useful for resin feed lines. When used as a surface media, be sure to place peel ply beneath the Filter Jacket. Otherwise, it will permanently attach itself to the laminate.
Spiral tubing (#1403) sometimes called spiral wrap, is a plastic ribbon that is coiled into a tube shape. Due to its construction, air or resin can enter or leave the walls of the tube throughout its entire length. This property makes spiral tubing ideal for in-bag vacuum lines or resin feed lines. When used as a feed line, resin will quickly travel through the tube, but simultaneously seep out along the way. This allows quick wet-out of a long stretch within the laminate. Be sure to wrap spiral tubing in peel ply for easy removal.
Omega Flow Lines (#2403) are designed for use under the bag in resin infusion applications, replacing spiral tubing. Omega Flow Lines incorporate an ''Omega section'' internally to transport resin along the surface and into the part. Simply attach your resin feed lines to the Omega Channel. Once the channel is full, resin will be dispersed into your part. Omega Flow Lines are made from translucent silicone rubber and are reusable. Apply mold release to the inside of the channel prior to each use and thoroughly clean the channel once removed from your part. These flow lines leave minimal or no mark off on the part when used in conjunction with our flow media and peel ply.
 Photo credit IStock Photo.
This diagram shows the addition of EnkaFusion Filter Jacket, which will be used as a resin feed line.
In addition to the feed line, a smaller piece of EnkaFusion Filter Jacket is placed on top as an anchor for the T-Fitting, which will be the connector for the resin feed line. It is necessary to lock the T-Fitting into place to prevent shifting and ensure a steady flow rate. Cut a slit into the top layer for the fitting to poke through. Figure 1 illustrates the three pieces involved, while figure 2 shows the finished sandwich.
 Photo credit IStock Photo.
Select and Install Your Vacuum Lines
In traditional vacuum bagging, a Breather/Bleeder material is typically used to both absorb excess resin and drive vacuum throughout the laminate. Breather/bleeder is typically not used in resin infusion.
Instead, in VIP, the vacuum lines are extended with the sealed bag. Spiral tubing is ideal for this purpose, in order to achieve complete infusion, resin must be pulled to all corners of the laminate. Because the standard set-up infuses into the center of the laminate, spiral tubing would usually be placed around the flange. Once again, spiral tubing should always be wrapped in peel ply.
When using spiral tubing, it may have a tendency to straighten out or not stay where you want it. The simplest way to counteract this is to use small pieces of sealant tape. Just ball it up, stick it to the tubing, and then stick it to the mold.
 Photo credit IStock Photo.
Step Three: Vacuum Bag and Attach Your Resin Line
Build Your Vacuum Bag
Once the dry materials are in place, it is time to build the vacuum bag. The bag should be tight, but still allow plenty of room for all the materials, including networks of tubing. Too much or too little bag can result in resin pooling or improper infusion.
One the bag itself is built, attach tubing for the resin and vacuum lines. Be very careful when making cuts through the bag for these tubes. It is frequently these connections that spring leaks.
Before the pump is switched on, it is important to clamp off the resin line. Because the vacuum is drawn before the introduction of resin, the resin tube will act as a temporary "leak" that must be sealed off. Simply clamp off this line by creasing the tube and attaching a #1605-A Flow Regulator to hold it in place.
| Item |
Description |
|
| Flow Regulator |
Clamping off tubing to regulate resin flow is a critical step in the resin infusion process. To use, simply crease the vacuum tubing back onto itself, slide the regulator into place over the crease and lock into place. |
|
Allow for Prohibiting Resin From Entering the Vacuum
Resin Trap
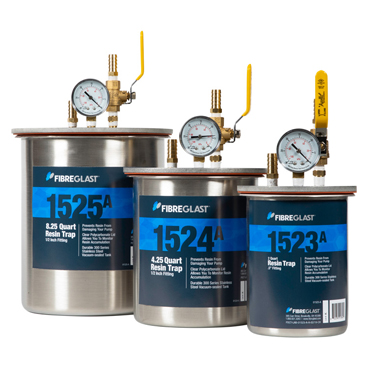
One key piece of equipment that is important to understand is the Resin Trap. A Resin Trap is an airtight container placed within the vacuum tubing circuit, between the laminate and the pump, to catch any excess resin before it can enter and destroy the vacuum pump. When set up properly, the vacuum tubing will flow out of the laminate and connect directly to the resin trap. A separate tube will then leave the resin trap and connect to the vacuum pump.
During VIP, vacuum pressure is being used to draw resin into the laminate. In many cases, resin will flow completely through portions of the laminate while still filling dry spots in another. This is normal and is no cause for alarm, except that the resin will frequently enter the vacuum line while continuing to infuse resin.
With the Resin trap, all excess resin will be collected into the trap, while air is still allowed to flow back to the pump. Fibre Glast offers three resin trap sizes for your project needs- #1523-A 2 quart, #1524-A 4.25 quart and #1525-A 8.25 quart. If the part is large and significant resin flow into the vacuum line is expected, any number of resin traps may be placed in sequence. As soon as one is filled, the resin will overflow into the next one.
| Item |
Description |
|
| Resin Trap |
Our stainless steel resin traps come complete with a vacuum gauge, shut-off valve, 1/2" fittings and a 1/4" aluminum lid. |
|
| Partall Wax |
Resin can be difficult to remove from the resin trap after it has hardened. Because of this, it is recommended that you apply a mold release wax to the inside of the reservoir before each use. |
|
Step Four: Vacuum Pump
Attach the Pump
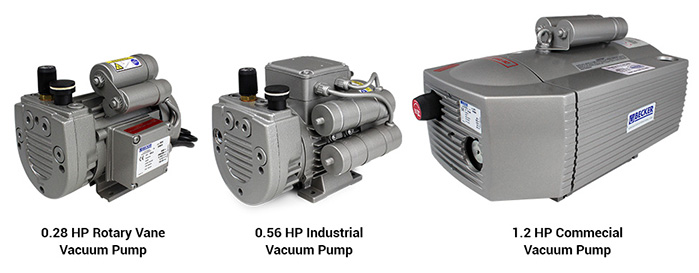
Once all the components are in place, it is time to attach the vacuum pump itself. Because resin is infused through vacuum pressure, it is quite beneficial to have a stronger pump. In general, a stronger pump will help expedite infusion.
| Item |
Description |
|
| 0.28 HP Combination Pressure/Vacuum Pump |
This oil free vacuum pump is perfect for basic vacuum bagging applications. It is quiet, compact and portable! While it is not designed for continuous use, this pump is perfect for completing a small, quick project where vacuum is needed for less than 2 hours. |
|
| 0.3 HP Rotary Vane Vacuum Pump |
This oil free rotary vane vacuum pump is ideal for applications in small shops and universities where part sizes and shapes are constantly changing. |
|
| Industrial .56 HP Vacuum Pump |
This heavy-duty pup suits nearly any size of vacuum bagging or resin infusion application. It is designed to run continuously with very little maintenance—perfect for handling the workload in a busy shop. |
|
Ensure Proper Vacuum
Once attached, switch the vacuum on. As in any vacuum bagging application, leaks pose the biggest problem. Even the smallest leak can greatly hinder performance or even completely ruin a part. Because VIP offers unlimited time to seek out these leaks, considerable effort should be made to find them all.
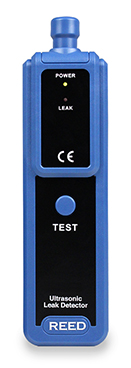
Even so, there are frequently small leaks that are seemingly impossible to discover. We offer instruments that can greatly aid this process. Our #3819-A Ultrasonic Leak Detector converts ultrasound signals produced during the vacuum bagging process into easily recognizable audible sounds. The Ultrasonic Leak Detector features a LED bar graph when displaying leakage levels, as well as an earphone jack when working in loud environments.
For those on a tighter budget, a simple stethoscope can be used to detect leaks. Though it won't provide the precision of a ultrasonic detector, a #1504-A Stethoscope will amplify leaks and provide a helpful aid at minimal cost.
| Item |
Description |
|
| Ultrasonic Leak Detector |
An Ultrasonic Leak Detector converts the ultrasonic frequencies of air leaks to easily recognizable audible sounds and filters out background noise. This means that you can pinpoint leaks within your vacuum bagging or resin infusion set-up that are almost impossible to find otherwise. |
|
| Stethoscope |
A more budget friendly alternative to detecting air leaks in your vacuum infusion set up. Manufactured to surgical standards, this stethoscope is designed to pinpoint smaller noises that can could be a sign of big problems in your vacuum infusion process. |
|
Step 5 Prepare for Infusion
Select Your Resin
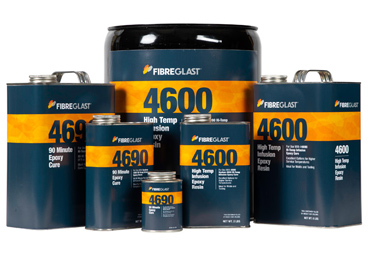
Resin choice is another key aspect of VIP. There is a common misconception that a special "infusion resin" is required. While this is not the case, there are some general guidelines that should be considered when making your decision. One important piece of information that should be examined is the resin viscosity. Typically, lower viscosity will aid infusion, as it allows easier permeation of the reinforcement. This is not to say that higher viscosity resins will not work, but they may require more careful planning, more resin lines, and more flow media. Fibre Glast offers several resin options for vacuum infusion, depending on the structural and physical property requirements of your project.
| Item |
Description |
|
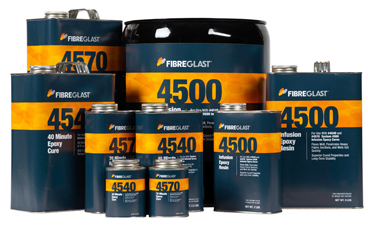
| System 4500 Infusion Epoxy |
Our System 4500 is a low viscosity epoxy system designed for the fabrication of parts and structures by the vacuum infusion process. With a viscosity of 320 centipoise, this system flows extremely well, and produces dense, void-free laminates with superior physical properties. |
|
| System 4600 Hi-Temp Infusion Epoxy |
Our System 4600 Hi-Temp Infusion Epoxy is an excellent option for composite tooling that requires higher service temperatures. This low viscosity (575 centipoise) epoxy system has found good acceptance for use in vacuum infusion fabrication and tooling processes. |
|
| Vinyl Ester Resin |
Most frequently used resin for vacuum infusion. At a viscosity of 275 centipoise, our #1110 Vinyl Ester resin is very well suited for the process. This resin is often referred to "infusion resin" within the industry. |
|
| Polyester Resin |
Resins such as the #77 Molding Resin and #90 Isophthalic Resin provide a viscosity of about 475 centipoise, allowing it to infuse quite readily during your vacuum infusion project. |
|
| System 2000 Epoxy |
System 2000 offers a viscosity of 900-975 centipoise (depending on hardener choices) meaning it will infuse slower. However, high quality parts have been made with System 2000 with VIP for a variety of applications. Set up considerations may include more feed lines and additional flow media. |
|
Resin Bucket Set-Up
 Photo credit IStock Photo.
Because no brushes or rollers are used in the transfer of resin, some steps must be completed to ensure that the resin line stays in the bucket, as any air entering the line could be fatal to a project. These tools include the bucket itself, a resin line holder, zip-strips, and a spring clamp. The resin line holder is basically a length of rigid material that is attached to the resin tubing via the zip-strips. Once attached, this ensures that the resin tubing stays fixed in a straight line. This eliminates the tube's natural tendency to twist and curl. It is also helpful to cut the end of the tubing at an angle. Otherwise, the tube could potentially vacuum seal itself to the base of the bucket, preventing the flow of resin. Once attached to the holder, the line is clamped in place to the bucket. The resulting assembly should ensure that the resin line will stay exactly where it should be.
Step 6 Resin Infusion
Catalyze Resin and Allow it to Infuse
Once everything is in place and ready to go, mix up the resin. Double check that the resin bucket assembly is firmly in place so the tube will not leave the bucket. Once this is satisfactory, remove the flow regulator to unclamp the resin inlet. Resin should quickly be sucked through the tube and into the laminate.
Once resin reaches the laminate, the resin feed line will quickly fill up. Once full, the resin will begin to expand outward into the reinforcement. The rate of infusion depends upon many variables, but the resin should be visibly moving. Allow this to continue until the entire laminate is saturated.
Clamp Off Resin Line
Once the laminate is completely wet out, there is no need for further resin to enter. If the bucket were to be sucked dry, then destructive air bubbles would enter. To prevent this, the resin line should be clamped off once it's no longer needed. This is accomplished the same way it was before resin was introduced; crease the tube and attach a Flow Regulator. While performing this task, it is crucial that it be done carefully and without significant force that could potentially spring a new leak.
Once the resin line is clamped off, the infusion is complete. However, it is still not time to turn off the vacuum pump. Keep the pump running to maintain constant vacuum pressure until the resin has sufficiently gelled. Otherwise, air could be introduced prematurely.
Step Seven: Experiment and Test for Improvement
Helpful Supplies for Vacuum Infusion
Like any lamination method, there are certain supplies for VIP that are not required but offer significant advantages. These items can save time and help gather useful data for further experimentation.
Infrared Thermometer

A useful piece of information during infusion is the resin temperature. The temperature tells you when the resin is beginning to cure, when the laminate has achieved peak exotherm, and when the laminate has returned to room temperature.
To determine the temperature, an Infrared Thermometer can be used. This simple device can be pointed at an area and will instantly give a temperature reading. It is useful to regularly check a number of areas including the resin bucket, the resin inlet, and the outer portions of the resin flow in order to keep tabs on its progress.
| Item |
Description |
|
| Infrared Thermometer w/Type K Thermocouple |
Fibre Glast's #3804/#3805 Infrared Thermometer is designed to read surface temperatures from -4°F to 392°F within a 3.6° accuracy. Simply point and click for an instant digital read on the back lit display. This Infrared Thermometer is also available with a NIST Certification when needed. |
|
Stopwatch and Marker
While infusing, and especially when practicing with VIP, it is a good idea to monitor resin flow rates and resin flow paths over time. This can easily be done with a simple stopwatch and a marker. Start the timer when resin is first introduced into the laminate. At regular intervals, mark the bag with the resin's current position. This piece of information can be especially helpful upon further infusion attempts, determining if small changes in set-up have any noticeable effect.
Typical Variations and Set-up
With an understanding of basic theory and supplies, it is time to discuss variations of materials within the mold. Keep in mind there is no one correct way to do this; however, the general idea is the same regardless of arrangement choices.
When choosing material arrangements, it is helpful to understand why resin travels the way it does. When a vacuum is pulled, all air is removed from the laminate, creating open spaces of complete vacuum. This causes pressure to be placed on the laminate. Naturally, this pressure will want to be relieved by refilling the open spaces. In VIP, resin will provide this relief. There is a common misconception that the vacuum pump is actually sucking resin into the part. In actuality, it is the vacuum pressure that is doing the work. Once a vacuum is achieved, the pump itself can theoretically be clamped off and removed from the equation (though this is not recommended). Infusion will still occur.
In order to create an even resin front that will wet-out the entire laminate, keep these two resin flow characteristics in mind.
Resin wants to fill open spaces created by the vacuum.
Resin wants to take the path of least resistance
Utilizing these two concepts, it is possible to manipulate resin across an entire laminate with as little as one resin inlet and one vacuum outlet. The trick is placing in-bag extensions of these lines in order to create a uniform resin front. The following figures show how this is done.
In figure 1, resin and vacuum lines are placed without the addition of any in-bag extensions. As a result, resin will basically travel from one point to the other. However, the majority of the laminate will remain untouched, and therefore ruined.
In figure 2, resin and vacuum lines are extended. Vacuum line extensions can be made with spiral tubing, while resin feed line extensions can use either spiral tubing or EnkaFusion Filter Jacket. In this example, resin will move very quickly through the gray areas. When resin is first infused, the feed line extension will fill very quickly. Once this line is full, resin will attempt to reach the nearest possible vacuum line. Because the vacuum line has been extended as well, the nearest vacuum point will be directly across the laminate. As noted by the resin path arrows, the entire lay-up will be infused.
 Photo credit IStock Photo.
General Reminders
Regardless of any particular arrangement of materials, there are a few items that are important to note.
Be sure to include a Resin trap in the vacuum line between the mold and the vacuum pump if there is any possibility that resin can enter the vacuum line while still infusing
Any material that will be later removed (such as surface flow media or spiral tubing) should be placed on peel ply. Otherwise, it will be infused into the part.
A Common Variation
In the following example, spiral tubing is used for both the resin feed and the vacuum line. Resin will enter on one side and fill the length of the tubing very quickly. At that point, resin will begin to flow across the laminate. While this approach is simpler to set up, the resin will need to travel across a longer distance. Depending on what materials and equipment are used, this distance becomes a significant factor. However, on the up-side, the inside surface texture of the finished part will be consistent.
 Photo credit IStock Photo.
Larger Projects
Now that the theory of infusion is understood, it is very easy to expand on these concepts in order to apply them to larger projects. As resin travels away from the feed line, it will encounter more resistance, ultimately slowing down. To combat this, large projects will require multiple resin and vacuum lines. In general, resin lines should not be more than 30-36" apart under ideal conditions. However, when using less permeable materials or higher viscosity resins, this number may need to be reduced. It is important to experiment with the specific material set before attempting to create a large project.
Conclusion
 Photo credit IStock Photo.
Vacuum infusion can appear to be a daunting endeavor, but it doesn't have to be. Experiment with different materials and arrangements, as small changes can create significantly different outcomes. Though the first few attempts may be unsuccessful, once the basics are learned, infusion will quickly become second nature. As always, Fibre Glast has a complete line of products for the successful completion of your vacuum infusion project including:
- Vacuum pumps, resin traps and tubing
- Flow media, peel ply and bagging material
- Fiberglass, carbon fiber and Kevlar reinforcement fabrics
- Infusion epoxies and vinyl ester resins
- A complete line of precision measuring instruments


