 Photo credit IStock Photo.
Introduction
The majority of current composite applications focus on molding for rapid part reproduction and maximization of the material properties themselves. Regardless of the type of mold used, female cavity or male plug, the mold surface is critical. This white paper describes the techniques necessary to achieve a Class 'A' mold surface finish as well as the steps required to maintain it.
The mold surface affects three important areas of the molding process. First, the quality of the mold's cosmetic finish will be reproduced in every part. Regardless of whether it affects the physical performance of the part, every customer will judge your work by the surface quality. It is much easier to perform the steps one time on the mold surface than to touch-up every part after it is finished. Second, the mold surface affects the release characteristics of the mold. Any imperfections can contribute to adhesion problems. When a part sticks in a mold, extreme measures are often used to force the release. These can lead to broken flanges and mold edges, gouges on the surface itself, and destroyed parts or molds. Finally, the mold surface coat is the protective barrier to the rest of the mold. Just as boats and other fiberglass structures can deteriorate due to exposure, a porous mold surface permits water, chemicals or other harmful agents to enter into the structural laminate below. For these three reasons, all molds will benefit from the procedures described below.
What is a Class 'A' Surface Finish?
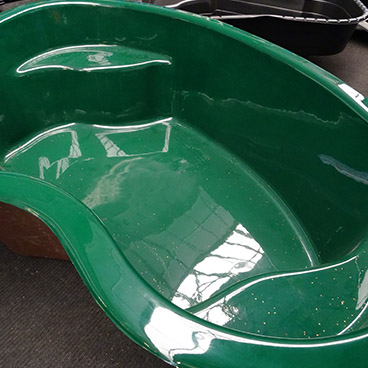 Photo credit IStock Photo.
 A Class 'A' finish is a perfectly polished high luster surface free of porosity and scratches of any kind. The term originated in the marine and automotive industries. Examples of such a finish can be found on high quality boat hulls and automobiles. However, those finishes are achieved through two different procedures. Cars have primers and paint systems sprayed over medium quality metal surfaces. The paint flows into a self-leveling thin film and requires polishing to achieve a true Class 'A' surface. The boat hull, however, receives its finish directly from the mold itself. If the mold has a Class 'A' finish, all the parts produced in it will also have the same high quality surface. Construction of quality molds can decrease final finishing time and increase overall part quality.
A quality mold surface begins at the plug stage. Final plug preparation directly influences the quality of the mold surface. Every detail, good or bad, will be reproduced in the mold. Do not expect to remove defects or flaws after they have been transferred to the new mold surface. While it is true that many irregularities can be removed or smoothed by sanding the mold surface and repolishing, those operations increase porosity and reduce the thickness of the tooling coat. The tooling coat was applied in the proper thickness originally for a number of reasons. Generally, the less the tooling coat is sanded the longer its service life will be. Also, even light sanding of the mold surface can change the dimensions of the finished parts. This is unacceptable for many close tolerance molding applications.
The steps to creating the Class 'A' finish on the plug are the same as for the mold surface and will be described below. However, there are some differences between materials which are worth noting.
Sealing the Plug
The plug must be sealed in a material which is heavy enough to hide the multiple shaping compounds used below and durable enough to be sanded and polished to a mirror-like luster. Few primer/ sealers are able to do both. Varnish, lacquer primers, paint and gel coat have been used to seal wood, metal, plaster, plastic, foam and fiberglass shaping compounds for years. Varnish, paint and primers often fail to completely hide the multiple compounds and are too porous to polish adequately. Gel coat is certainly heavy enough to hide the underlying substrate, but it is difficult to spray evenly and can require back breaking sanding efforts to polish smoothly.
Duratec Surfacing Primer
 Duratec Surfacing Primer is gaining widespread acceptance as the plug surfacing compound of choice for the marine, automotive, and patternmaking industries. It is a polyester based primer which has numerous advantages over all the products used in the past. First, it can be sprayed though conventional automotive type siphon or HVLP guns which offer the best control and delivery of any system on the market. The more evenly the primer is applied the less sanding is necessary to achieve a smooth finish. Second, it is a high build material which fills many surface imperfections and effectively hides all the layers beneath it. Third, it sands easily. Begin with 240 grit sandpaper if necessary and proceed through 1000 grit before buffing. Finally, it is specially formulated to develop and maintain a highly polished finish. When sprayed correctly at 35-50 psi, the surfacing primer has very little porosity to interfere with the luster.
A properly shaped plug covered in a coating of highly polished Duratec Surfacing Primer is the perfect starting point for molding. Follow the next steps to transfer the Class 'A' plug finish to the final mold surface.
Product Checklist
| Item |
Description |
|
| Acetone |
Acetone is a powerful solvent, used in the composites industry as a standard for cleaning and degreasing. Use with a clean paper towel to remove dust, wax and grease from the surface of your plug prior to applying for surfacing primer. |

|
| Duratec Gray Surfacing Primer |
Duratec surfacing primer offers a high heat distortion temperature and minimal shrinkage. Minimal shrinkage allows for repairs and blemishes to easily be hidden, and it gives the surface of our project a smooth, class A finish. |
|
| Spray Guns |
Fibre Glast carries a wide assortment of spray guns with which to spread your surfacing primer in order to meet the precise needs of your project. |
|
| Sandpaper |
After your primer has been applied, sanding with 240 grit sandpaper and increasing in grit to 1000 will ensure a smooth, even surface. |
|
The 5 Steps to Developing a Class 'A' Mold Finish
- Start with a Class 'A' finish on the plug. As stated above, this step cannot be overlooked. It is perhaps the most significant factor in the mold surface preparation process. Steps two thorough five need to be followed to prepare the Class 'A' plug surface as well as the mold surface.
- Follow the manufacturers recommendations for mixing, catalyzing and applying the tooling coat exactly. Excessive catalyst or thinning agents can drastically reduce the performance of many surfacing agents.
- Sand the mold surface and edges using 400 grit or finer wet/dry sandpaper. If a significantly coarser paper is needed for leveling the surface, something went seriously wrong with either step 1 or 2. If this is the case, proceed to the repair section of this brochure for instructions before going any further. Continue sanding the mold surface with finer grit paper. Follow the 400 grit with 600 and then 1000 grit. Remember to change the water and rinse the mold surface when switching to the finer paper as minute sanding particles the size of the previous grit will otherwise remain on the surface. These particles will leave scratches coarser than the new paper is able to remove.
- Wash, dry, and inspect the surface. If any scratches remain, back up and sand using the finest paper which will remove the texture.
- Use a quality polishing compound and buffing wheel to polish the surface to a high luster. Again, follow the manufactures recommendations for the products used. If there are two compounds available, use them in their intended sequence. Do not plan on skipping one of the two and still getting the desired results.
Clean excess polishing compound from the pad frequently. Large clumps of compound can actually scratch or streak the surface again requiring more removal work. If a high speed buffing wheel is used, do not work in one area too long or the compound may burn through the tooling coat. Move quickly at first to prevent problems until experience is gained.
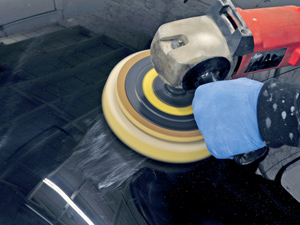 Photo credit IStock Photo.
 Areas which cannot be reached using the
buffing wheel must be polished by hand. Apply the needed amount of compound to a clean terrycloth towel, diaper or cheesecloth. Be sure the fabric is soft and will not scratch the mold surface. Remove rings, watches or other jewelry which could scratch the mold surface. Some people even clip their fingernails. It may be difficult to achieve the same luster, but hand polish the surface until it resembles the areas which were machine buffed. Wipe the surface with a clean rag to remove any remaining polishing compound. Condition the surface for release following the instructions provided by the manufacturer of the release agent. If these five steps have been followed, the resulting molds will have a Class 'A' surface finish. The parts produced in them will require very little post finishing and the molds will actually last longer than poorly finished types.
Product Checklist
| Item |
Description |
|
| Tooling Gel Coat |
Tooling gel coats are abrasion resistant gel coats, that provide gloss retention, superior hardness, exceptional craze resistance, and minimum distortion. Fibre Glast carries both orange and black colored gel coats. |
|
| Gel Coat Spray Guns |
Spray guns are the most effective way to spray your gel coat across the surface of your mold. It will provide a superior quality finish, while being less wasteful when compared manual application with brushes or rollers. |
|
| Sandpaper |
After application of your gel coat, you will need to sand the surface in order to give it a smooth, even finish. Remember to use increasingly levels of finer grit sandpaper in order to create an even surface. |
|
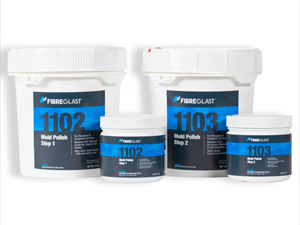
| Two Step Mold Polish |
Fibre Glast's two step mold polish compound works together to provide an outstanding finish while reducing the overall amount of compound needed for polishing your mold. |
|
| Buffing Pad |
This half lamb's wool-half synthetic pad is designed to work with our #1102 Step 1 and #1103 Step 2 mold polishes, and will withstand the 2500 rpm buffing s eeds recommended for their application. |
|
How Long Will the Gloss Last?
Every mold and release system functions differently, but some generalizations do exist. Well conditioned polyester molds can often produce 20-40 parts before needing attention. Epoxy tooling coats are even more durable. Since release agents provide the only barrier between the mold and the part, they do help preserve the surface finish. Selecting a quality release agent will maximize the gloss retention of the mold. If the surface finish is extremely critical it should be inspected following the cleaning procedure and before the next production run.
Mold Surface Maintaince
Proper maintenance of the Class 'A' finish can significantly increase the lifespan of the mold. A mold maintenance program usually consists of regular inspections of the surface and the structural elements of the mold. When the surface dulls, it is time to clean and re-polish the mold.
All molds are slightly affected by the heat generated during the cure cycle. Additionally, styrene can build up on molds used to make polyester parts. It makes the surface appear cloudy or chalky white. Epoxy molding does not usually leave residues but the molds will still benefit from periodic polishing.
Before polishing can begin the mold release must be stripped from the surface. Use wax and grease remover or other recommended product to wipe the release agent from the mold. Evaluate the condition of the mold surface. If deep scratches are evident, use a finer grit sandpaper (600 to 1000 grit) to remove them. Otherwise, follow the same polishing schedule that was used to develop the original Class 'A' finish.
Mold Repair
 Mold repair can be categorized into two types: structural or resurfacing. Structural damage is usually obvious, but subtle cracks in the mold surface are often due to structural damage below. To fix the cracks, the mold may need extra reinforcement followed by resurfacing. If the structural damage is severe, it is often cheaper to remake the entire mold than to refurbish it. If no pattern exists or the structural damage is relatively minor, the repair can be performed like any other structural repair.
Structural repair is beyond the scope of this brochure. However, a variation specific to mold repair is worth noting. Specifically, it will be necessary to clamp or support the mold so it is not distorted while curing.
Mold resurfacing is a realistic option to mold replacement, if only the surface has deteriorated. Once again, Duratec Surfacing Primer is the product of choice for upgrading polyester tools. However, the surfacing primer can be sprayed on epoxy molds once the surface has been properly prepared. For strong adhesion of the surfacing materials, remove enough of the existing gel coat so that all contaminants and porosity are eliminated. The older and more porous the mold, the greater the amount of gel coat that must be removed. Begin by sandblasting or sanding the surface with 80 grit paper. If only a portion needs to be recoated, mask off the remaining areas thoroughly. Apply 10-15 mils of Duratec Surfacing Primer to seal the exposed gel coat porosity and provide a surface barrier. When cured, block sand the surface up to a 180-grit finish and wait overnight for it to fully cure. Develop the final contours by sanding the primer with 220 to 240 grit paper. This sanding operation is important because the final top coat is relativly thin and will not hide imperfections.
The addition of 15% Duratec Hi-Gloss Gel Coat Additive to polyester tooling gel coat will yield a blend that is easily sprayed to form the final mold surface. Use conventional automotive spray equipment to apply a fine mist coat. Wait 2 minutes for the solvents to flash off, then continue building wet coats to 6-10 mils or thicker if desired. Spray pressures should be 35-50 psi. There is no need to inhibit the cure using styrene wax as the Hi-Gloss tooling blend will air cure to a hard, glossy finish in 4-6 hours. Use Wetordry Sandpaper (240-grit to 1000-grit) for finishing and wait overnight for the surface to fully cure. Remove any remaining scratches with the polishing compound.
Product Checklist
| Item |
Description |
|
| Duratec Gray Surfacing Primer |
Duratec Surfacing primer offers a high heat distortion temperature and minimal shrinkage during the curing process. This allows for repairs to easily be hidden, while the primer itself is easily sandable and can be polished to a class "A" finish. |
|
| Duratec Hi-Gloss Gel Coat additive |
When combined with your tooling gel coat, Duratec Clear Hi-Gloss Gel Coat Additive will improve the gloss retention, impact resistance, and heat distortion resistance of your mold. |
|
Mold Storage
How a mold is stored between uses is an important aspect of mold maintenance. Here are a few tips:
- Always put the molds away clean. Begin by scraping resin build-up from the edges and flanges. Use compressed air to blow debris off the mold surface. If an air source is not available, wipe cautiously so the surface coat is not scratched. Finally, remove excess release agents remaining on the mold. Follow the suggestions of the release agent supplier if more than soap and water are necessary.
- Inspect the surface for defects. Pull the mold from the production schedule if any serious problems are detected. It is usually cheaper and quicker to correct a flaw before it becomes a major problem.
- Store the molds on their support structures if they were constructed with them. Assemble multiple piece molds or store them in such a way that supports each component evenly so distortion is not a problem. If possible, store molds with the cavity side down so dust does not collect within them.
- If molds are to be stored for extended periods, spray a heavy coat of PVA over the surface. This can keep paint mists and other overspray often found in the shop environment from settling and sticking to the mold surface. Rinse away PVA before reusing the mold.
Product Checklist
| Item |
Description |
|
| PVA |
Polyvinyl Alcohol, or PVA, should be sprayed on to molds that are expected to be stored for extended periods of time. This will prevent contaminants from sticking to the surface of your mold, and potentially damaging it. |
|
Conclusion
If these procedures are followed, your plugs and molds will achieve the highly desirable Class 'A ' surface finish. The parts produced in the molds will have a better surface quality, require less finishing time, and the molds will have a longer service life. Proper storage and maintenance procedures should be followed to minimize downtime of the molds. Finally, Duratec surfacing products reduce the effort and cost of refurbishing mold surfaces. This can extend the life cycle of the mold significantly.


