Introduction
Until recently, producing a single, functional part from composite materials was impractical. Much of the problem was due to the rough and wavy surface that usually resulted when these materials were not used inside a mold. Also, non-artistic builders find it intimidating to sculpt the shapes freehand. Finally, many resin materials are formulated to be used inside a mold and do not work properly when exposed to air. Consequently, someone wanting to build a single part or prototype, even the plug for a mold, would often be discouraged and turn away from composites before even getting started!
New materials and techniques enable significantly improved results! Sculpting polyurethane foam around simple templates, reinforcing with fiberglass and finishing with an advanced primer system (such as Duratec) permits a single, functional and cosmetically attractive part to be made, even by someone new to fiberglass!
What is Moldless Composite Construction?
Moldless composite construction is the process through which a functional composite part is built in the first production cycle without the time and expense needed to generate a female or cavity type mold. It could more accurately be named internally molded construction because a form does need to be made, but this form is covered by reinforcement and often stays with the finished part.
The internal form differs from a classic male mold because it must be made from materials durable enough to be put into service when the part is complete. The plasters, styling clays, body fillers, and wooden frames of plug or male mold construction cannot withstand the rigors of regular use. They are also very heavy and usually fill the entire volume within the part leaving no hollow room for occupants or other internal requirements.
Step One: Design
 All quality composite parts must be designed to optimize the type of construction being employed. Moldless composite construction requires slightly different design features than classic open molding. Molded parts receive their smooth surface from the mold itself and require little post finishing. Moldless parts must be built from the bottom up with compatible materials throughout. The final surface will only be as good as the work done on the substrate below it. What effort is expended to build parts this way is mostly done to create the shape and to achieve a smooth outer surface.
Moldless construction is similar to plug construction in that a high quality reproduction of a desired shape is the final goal. It differs from plug construction because it must still have the advantages of a finished composite part. Namely, it must remain lightweight, strong, resistant to vibration and corrosion as well as any other factors necessary for the application. Foam and wood are the most widely accepted materials for constructing the internal formers. They are easily shaped, have relatively high compression strengths, and are cost effective.
A moldless composite part can be designed in two ways. The first way is to create a form which is skinned with fiberglass on the outside. The form is then removed from the inside leaving just the reinforced outer shape. This will yield a thin lightweight fiberglass shell of the desired shape that often remains quite flexible. This is a good method to use when the part will be fully supported and the inside cavity must remain as large as possible.
The second way is to leave the form in place and reinforce it from both the inside and the outside. This takes advantage of the stiffness associated with a sandwich core structure. Obviously, access must be available on both sides of the form to do this.
When planning a moldless project, consider all the objectives the finished part needs to meet. Weight, stiffness, internal dimensions, and the final external shape all need to be considered before beginning. Material selection is important to achieve the balance between all these properties.
Since the intended shape is always known, it is common to begin designing from the outside and work in. Choose a material which will shape easily to the external contours. Polyurethane foam sands and cuts well so it is used very often for this type of construction. If the curves are very broad and the cavities quite deep, select a thick foam so the sanding will not go all the way through it. Individual sheets of foam can be stacked and glued together to make a panel of any thickness. Experience also teaches to use thicker foam across any broad unsupported areas. The longer the unsupported span, the thicker the foam should be. For instance, 1" thick foam can be used to fill any cavity up to about 36" wide. However, all cavities broader than 36" should use 2" thick foam so the shape does not distort while sanding.
Next, consider how much room must remain on the inside of the part. A legitimate concern with this technique is that you can lose a little space on the inside due to the thickness of the foam. If the first method of moldless construction is followed where the internal form is torn out after molding, this is not a problem. However, if some of the foam is to remain to help stiffen the part make sure adequate clearance is maintained around all moving or hot parts which might be housed within the cavity. If a thick foam was necessary for the external shaping but more space is needed internally, the foam can be sanded thinner on the inside after the outside is reinforced with fiberglass.
Weight, corrosion resistance, and stiffness must also be addressed. Moldless parts can be as light as their molded counterparts, and both epoxy and polyester resins will provide good protection in most settings. However, stiffness does need more forethought because material selection can effect it dramatically. If the part needs to be extremely light and does not need to be very stiff, the thin shell can be made and the form removed. Just enough fiberglass can be used to have the part hold its shape, usually two layers of a medium weight woven cloth. If the part must be moderately stiff and light, more layers of fiberglass can be added with carbon fiber used in spots as a selective stiffener. If the part needs to be 'rigid', leave as much of the foam core in place as possible to form a sandwich. Skin this on the inside with fiberglass or carbon fiber depending on the ultimate strength needed.
The last thing to consider is the ultimate size of a composite part. Moldless parts actually 'grow' as they are reinforced. If the application is dimensionally critical, one must subtract the thickness of the outer fiberglass skin from the desired finished shape so the internal form is made small enough that everything will equal out when the reinforcement is added.
Product Checklist
| Item |
Description |
|
| Foam Sheets |
Fibre Glast offers an array of foam sheets with which fabricators can work from while performing a moldless construction. Polyisocyanurate foam sheets are generally the most popular, being easy to carve and shape to the specifications of the project. |

|
| Polyester Resin |
Polyester resin is one of the most popular and common choices for resin selection within the composites industry. It is ideal for both moldless parts as well as their molded counterparts. |
|
| Epoxy Resin |
As an alternative to polyester, epoxy resins will offer a greater added strength to your project. Keep in mind, however, that epoxy resins tend to be more expensive than the alternatives. |
|
| Fiberglass Fabrics |
Fiberglass fabrics are the foundation of the composites industry, and are used in a variety of applications. If your finished part does not need to be very stiff, two layers of a medium weight woven cloth of fiberglass will generally be sufficient. |
|
| Carbon Fiber Fabrics |
If you need to add more stiffness and strength to your part, adding layers of carbon fiber can greatly improve the physical properties of the reinforcement. Carbon fiber is generally more expensive than fiberglass fabrics. |
|
Step Two: Construction of the Internal Form
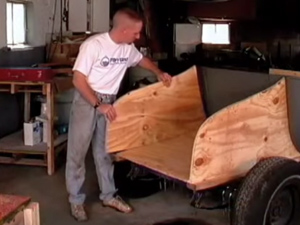
Following the designed plans, construction begins on the internal form or mold. Artistic individuals may be talented enough to sculpt the entire shape freehand, but a more reliable approach is to create dimensionally accurate templates which represent the final shape of the part. The templates are two dimensional silhouettes of the shape from the side or front of the structure. These are usually placed at the edges of the part or anywhere the shape changes dramatically. A good example to help visualize the silhouettes are the ribs in an airplane wing. Each rib is located in a precise spot in the wing and is responsible for creating the shape of the wing in that area.
 The templates provide support and a stopping point for the sanding blocks used to shape the foam. The templates can be made of wood, metal, or plexiglass. They need to be harder to sand and cut than the foam. This permits the foam to be sanded without affecting the overall shape of the structure. Draw the shape onto cardboard, cut it out, and trace it onto the chosen template material. Use a jig saw to cut out the form. Be sure to cut it slightly on the large side so it can be hand sanded to the exact final shape. Material cannot be added if the template is cut too small, it will have to be remade. The templates must be perfectly sized. It takes less time to fix an incorrect shape at this stage than to correct a problem later.
A loose framework is usually constructed to hold the templates rigidly in place. If the framework can be incorporated into the finished part such as the floor in a car, this step is quite easy. If the framework cannot exist in the final part, it will be necessary to design the support so it can be removed after the reinforced shape has been created. It is impossible to offer more specific advise on this procedure as the applications are virtually unlimited. Just remember to plan for this measure before proceeding.
The structure should now have the appearance of a skeleton. The next step is to fill in all the open space along the surface with foam. Select the foam that is stout enough to hold its shape across the span. Again, the broader the span the thicker the foam must be to remain rigid. Begin filling in the largest and flattest portions first. Measure the space in the frame and mark the foam accordingly. A long adjustable razor knife and a metal straight edge are used to cut the foam sheet. Try to cut all the way through the foam in one pass, as multiple cuts usually result in an uneven cut. If the cut is uneven or does not fit closely enough, use a sanding block with 40 grit paper to correct the fit.
Glue the foam to the framework using a quality wood glue or a glue gun. A hot glue gun will speed the procedure significantly. It is important to note two lessons in foam placement which must be followed for satisfactory results. First, the foam must be fastened to the templates so its surface remains higher than the templates in all areas. The excess foam will be sanded off in the shaping procedure to follow. Second, keep the glue below the outer edge of the template so that it does not have to be sanded. It is easy to gouge or sand away too much good foam while trying to level off a stubborn drop of glue. The hole can be filled with fillers , but cleanliness and forethought will eliminate the problem.
When the flat spans are filled with foam, cut beveled pieces to fit into the contoured areas. Thicker foam sections work well for this because they tend to be easier to shape. Cut the initial bevel with the knife, but sand the edges until they match up precisely with the adjacent foam sheet. The same two guidelines for gluing apply here as well. Keep the foam high and the glue joints low. Along the seam where two pieces of foam meet, the glue should also be kept below the level of the future surface. If it is difficult to keep the foam seams closed while the glue dries, insert a number of toothpicks along them. The toothpicks will clamp well and can be removed before shaping without damaging the surface.
When the entire surface is filled in, let the glue dry firmly before proceeding. The form will have a mottled and lumpy appearance at this stage with corners and excess foam disrupting the overall appearance of the structure. Do not be discouraged, the final shape is just about an hour from being developed.
Product Checklist
| Item |
Description |
|
| Sanding Block |
Fibre Glast's Perma-Grit sanding blocks feature a unique tungsten carbide grit that will outlast traditional sandpaper by thousands of uses. Each block's shape is designed to create an easy sanding for a smooth finish. |
|
Step Three: Shaping the Internal Form
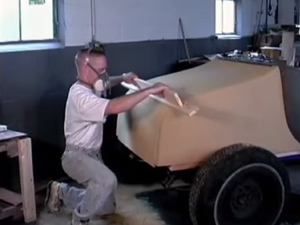 Shaping of the structure is actually accomplished by sanding the excess foam down until it is flush with the templates. The sanding blocks used must be absolutely flat so no warps or cavities are created on the surface. The sanding block must also be long enough to rest on at least two of the templates simultaneously. On small parts, short sanding blocks sold in hardware stores may be large enough to work. However, as the job becomes larger, the sanding block will have to be custom made for the job. 1"x 4" pine boards work well for this. Choose the lumber carefully so it is as straight as possible. Rip the lumber lengthwise to match the width of the sandpaper used. Autobody shops sell 40-grit air fileboard paper in 3" widths that works very well for this. Cut the flat sanding board about 1-2 feet longer than the width that needs to be sanded. This will permit a long side-to-side sanding motion that will keep the foam as flat as possible.
A second board needs to be screwed on edge to the first board forming a finished sanding block that looks like the letter "T". The second board makes the block very rigid and can be used as a handle. Next, attach the sandpaper to the block. The sandpaper must be attached firmly so it does not curl or bend as this will gouge the foam. This can be accomplished in a number of ways. Glue works well, but the paper may become a permanent part of the block. A staple gun can be used to fasten the perimeter of the paper and still permit changing. Just make sure the staples are all the way into the wood so they can't gouge the foam either.
Contoured or radiused blocks can be made to sand any edges that need special forming. Trace the silhouette shape onto a 2"x6" board and use a jig saw to cut out the pattern. Glue sandpaper to the surface of the block. This tool will enable a builder to shape a uniform contour over a long surface without any guesswork. Virtually any shape can be made this way.
Before sanding, remove all toothpicks or other clamping devices. Sanding progresses quickly but large chunks of foam near the edges can be cut off with a knife to save time. Do not attempt to trim anything in the broad flat sections as it is easy to cut away too much. Finally, be sure to wear safety glasses and adequate respiratory protection to guard against the nuisance dust created.
Begin with the longest block and sand perpendicularly across the templates. Again, keep each side of the block even so no twist or warp is introduced to the shape. Do not lift either side of the block to focus the sanding to just one area as this can also affect the shape. When a glue seam is encountered try to keep the center of the block on the seam while sanding. Lift the block and remove the glue dust frequently as this dust can cut the surrounding foam.
Soon the foam will be sanded flush with the template. The sanding block will vibrate more as it tries to sand the framework. Stop soon after reaching this point as further sanding will just erode the foam near the template creating low spots. This occurs because foam dust trapped under the block tends to accumulate by the template and is abrasive enough itself to continue sanding deeper in those areas. Periodic vacuuming will remove the dust and permit a little extra sanding if necessary. Drag a steel rule across the surface. If no daylight shines under the straight edge the sanding in that area is complete.
When the broad areas are finished, use the radiused sanding blocks to shape the sides, edges, or special contours of the part. These small blocks can gouge easily, so keep the sanding surface flat against the foam. Again, when the contour is uniform and no light is seen between the block and foam the shaping in that area is complete.
Step Four: Reinforcement of Internal Form
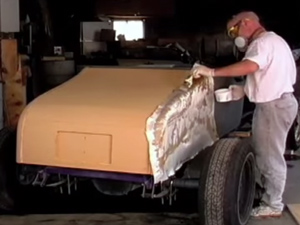 The foam shape that has been developed is quite fragile at this stage. The external structure must now be reinforced with layers of fiberglass and resin to protect it. The number and orientation of the layers needed is determined by the conditions in which the part will function. For extremely critical applications, testing should be performed by the individual to guarantee the part will be strong enough. Two layers of 7.5 ounce cloth may be considered the minimum necessary just to protect the foam from being crushed by casual handling. Often an additional lightweight fabric is applied last so that surface primers can easily fill the finer weave. A layer of 4 or 6 ounce fabric is good for this. Polyurethane foam can be covered in both polyester and epoxy resin. Some foams are dissolved by polyester resin, so if there is any doubt about compatibility test a scrap piece in the polyester. If the foam melts, repeat the test using epoxy. Epoxy does not usually attack most foams, but if it still melts it is necessary to find a different foam material.
To maximize stiffness using the sandwich principal, areas on the inside need to be reinforced as well. Some final shaping is usually necessary to smooth the inner surface before this can happen. Fabrics do not lay well over sharp 90 degree corners, so transitions between pieces of foam should be beveled wherever possible. If large voids or dents are present in the foam, fill them using a lightweight mixture of glass microballoons and resin just prior to adding the inner skin. The fiberglass will hold the filler in place and the surface will cure as a smooth section.
The inner plies of fabric should be symmetrical to the outer plies in weight, type, and orientation. That means if the outer schedule consists of two layers of 10 ounce plain weave fiberglass at 0/90 degrees and a layer of 6 ounce plain weave for surfacing, the inner plies should be used the same way. This will offer the stiffest part with the least pre-stress built into it.
Finally, do not reinforce any area that is to be modified later. It is much easier to make holes or other cut-outs if only one side is covered. After the modification is complete reinforce it to achieve a uniform inner skin.
Step Five: Modification of Foam Bonding of Sub-Components
 Modification: As stated above, modifications are easier to perform before both sides of the form are reinforced. Access panels, hardware mounting plates, and even drilled holes are examples of common modifications. Mark the outer surface where the change is to be made and use a cut-off wheel fitted in a Dremel tool or die-grinder to make the cut. Cut completely through the reinforcement, but don't worry about making it through all the foam. A long razor blade or kitchen knife will easily finish the cut. Sand smooth the new fiberglass edge.
The cut will expose foam in a new area, and this must be recovered with fiberglass. If it can be done along with the inner skin little extra preparation will be needed. Again, just bevel the edges where possible to smooth the inner shape. If the foam itself needs to be removed and replaced it can also be done at this time. Holes drilled through the structure should have a bushing or sleeve added to maintain the rigidity near the hole.
Bonding: If it was necessary to construct the part in multiple pieces these all need to be joined together at this time. Thorough surface preparation in all areas is necessary. If the joint is to have a fabric overlap for extra strength, be sure to scarf or taper sand the adjacent 3-6 inches. This will permit extra fabric or mat to be added without creating a bulge on the outer surface.
Begin by spreading bonding adhesive or modified resin on the mating surfaces. Squeeze the two parts together and clamp. Use the rounded end of a mixing stick to wipe away extra adhesive while creating a uniform fillet between the two parts. Follow the instructions provided with the adhesive, but it is usually best to allow it to begin to 'set' before continuing with the fabric overlaps. Let all the bonding materials fully cure before proceeding to cosmetic finishing.
Step Six: Cosmetic Finishing
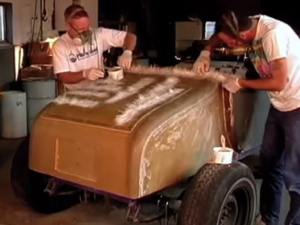
The final step is to prepare the structure for paint or gel coat. The entire surface must be scuff sanded to promote the best adhesion with primers and fillers. Initially, use a coarse grit paper to sand down any high imperfections. Switch to 80-grit to level the rest while scuffing. A dual action or DA sander is great for this procedure. It sands quickly but is easy to keep flat.
 When the high spots are leveled there will still be low spots which need filling. All areas that had large fabric overlaps will have low spots near them. Wipe the surface with the open palm of the hand to detect the irregularities. Use a squeegee to apply a layer of quality body filler along the surface to fill the depressions. When this is cured it must be sanded level with the surrounding areas. Remember to use a long sanding block over the broad surfaces so no extra low spots are created. Rarely can everything be filled perfectly the first time. Sanding usually exposes areas that are wavy or just need more filler. Long skim coats of filler over much of the surface can remove the final trouble spots. Complete the sanding using a finer 120-grit paper.
The final step before priming is to wipe down the surface with solvent to remove dust, waxes, and grease. Do not use a tack rag when priming with Duratec products. Acetone works best and can be applied with a clean paper towel. Be sure to open the rag when finished so the acetone can evaporate before it is thrown away. This will prevent possible fire hazards.
Once all of the surfaces are prepared, the part must be sealed with a primer capable of hiding all the various construction materials. Frequently when a freshly painted part first rolls into the sun, many imperfections appear through the painted surface. This has led to many misconceptions about fiberglass and composite parts. It is true that polyester parts are prone to shrinkage, but if the shrinkage is allowed to happen before the paint is applied or if a quality surface primer is used this problem can be completely avoided.
Duratec Surfacing Primer is a catalyzed polyester based material perfect for the task. It fills well and seals imperfections and different materials within a single uniform protective layer. It also has a higher heat distortion temperature than the layers below it. This means that once the Duratec has been sanded, sunlight and heat will be less likely to affect the final paintwork.
Duratec offers better chemical and corrosion resistance than factory gel coats, yet sprays like paint. This means that the primer layer can be sprayed on, sanded easily, and a final top coat of paint applied quickly. This offers the best of both worlds. A smooth high gloss painted finish which requires no sanding, and the durable corrosion protection just below it to protect the part.
Apply the primer using an inexpensive siphon feed automotive spray gun. Three passes building to a film thickness of 18-25 mils is usually sufficient to fill the fabric weave and provide good protection. The fabric texture may still be apparent because the primer fills the low spots and adds more material to the higher fabric yarns at the same time. This just raises the entire texture. When the cured primer is sanded with 220-grit paper all the texture will disappear leaving a surface perfect for painting.
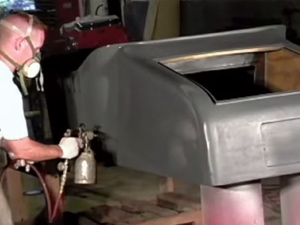 Automotive top coats by any reputable company will work well for final finishing. They spray easily, are self leveling, and cure with a perfect gloss. If the part is to enter extreme service conditions, ask the paint suppliers for their recommendations for that environment. Gel coat will still be necessary for structures fully submerged in water.
For smaller projects, these high quality top coats and primers may not be needed. However, these steps for achieving a quality finish are worth following even if simple spray cans of primer and paint are used.
Product Checklist
| Item |
Description |
|
| Acetone |
Acetone is a powerful solvent, used in the composites industry as a standard for cleaning and degreasing. Use with a clean paper towel to remove dust, wax and grease from the surface of your part. |
|
| Duratec Gray Surfacing Primer |
Duratec surfacing primer offers a high heat distortion temperature and minimal shrinkage. Minimal shrinkage allows for repairs and blemishes to easily be hidden, and it gives the surface of our project a smooth, class A finish. |
|
| Spray Guns |
Fibre Glast carries a wide assortment of spray guns with which to spread your surfacing primer in order to meet the precise needs of your project. |
|
| Sandpaper |
After your primer has been applied, the texture of the fabric may still be apparent across the surface of your part. Once the primer has been cured, sanding with a 220-grit sandpaper will leave the surface level and ready for painting. |
|
Conclusion
If the six steps to Moldless Construction are followed, a single functional part can be fashioned to the design specifications without the use of molds. Two dimensional drawings will turn into three dimensional projects, even for builders with moderate artistic ability. The part will still maintain all the advantages of composites without the added time and expense needed to create a female mold for a single production run or prototype. Surfacing materials like Duratec Primer have made the technique even quicker and the results more durable.
At the completed stage, the finished prototype may also be considered a functional plug for the production of a female mold. Molds can be made from painted parts, especially if they are quite glossy. If more modification is needed to make the part work perfectly it can be done before the final molds are built. Multiple designs can be tested in this way without wasting extra effort on molding until the final design has been selected.