Introduction
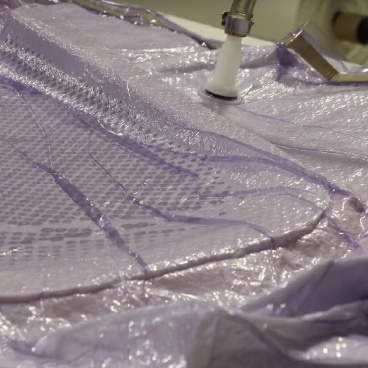 Photo credit IStock Photo.
 Vacuum bagging is a technique employed to create mechanical pressure on a laminate during its cure cycle. Pressurizing a composite lamination serves several functions. First, it removes trapped air between layers. Second, it compacts the fiber layers for efficient force transmission among fiber bundles and prevents shifting of fiber orientation during cure. Third, it reduces humidity. Finally, and most important, the vacuum bagging technique optimizes the fiber-to-resin ratio in the composite part. These advantages have for years enabled aerospace and racing industries to maximize the physical properties of advanced composite materials such as carbon, aramid, and epoxy.
What is Fiber-To-Resin Maximization and Why Is It Important?
 Photo credit IStock Photo.
The reason that composites are used increasingly is the strength-to-weight advantages that they offer. The key to obtaining these advantages is maximizing the fiber-to-resin ratio. The reinforcement (fiberglass, aramid Kevlar®, carbon, etc. is not particularly strong in the textile state. Also, thermosetting resins such as polyester and epoxy are quite brittle if cured without reinforcement. If excess resin exists in the laminate, the laminate will have more of the properties of resin only. If too little resin exists, places where the reinforcement is dry will cause weak spots. To optimize the resin content, the entire reinforcement must be saturated with resin with as little excess as possible. The technique of "squeezing out" excess resin to obtain a maximized fiber-to-resin content is the theory of vacuum bagging.
How Much Resin is Optimum?
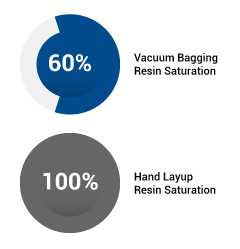 Photo credit IStock Photo.
Typically, a hand laminate uses in excess of 100% fabric weight by resin. A refined aerospace composite lamination will obtain as little as 40%. To determine the perfect combination for a given lamination is a sophisticated engineering problem beyond the scope of this brochure but a good target is 60% resin content. It is important to recognize that dry spots are "weaker" than resin-rich areas and maximization of fiber-to-resin is relative to a "real-life" fabricator and his or her ability to improve the parts made.
What do They do That I Can't do?
Often companies who insist on maximum fiber-to-resin content use autoclaves to both elevate the temperature and pressure surrounding the part and/or mold while curing these high-performance parts. An autoclave can elevate the pressure on a laminate two to three atmospheres. While this can be quite desirable, an autoclave is expensive and not readily available to the general public. This brochure assumes that a room cure, hand laminate is being improved and that an autoclave is not available.
What is an Atmosphere?
 Photo credit IStock Photo.
Vacuum bagging adds one atmosphere of pressure to a system. Although the technique is relatively inexpensive and easy to perform, it is worthwhile to understand the principle of atmospheric pressure and how it is measured so that you know if you have a problem with your system.
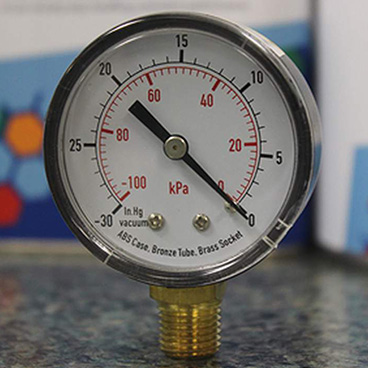
The atmosphere that surrounds the earth can be considered a reservoir of low-pressure air. This low-pressure air has weight which exerts a force that varies with temperature, humidity, and altitude. At sea level, that uniform pressure equals 14.7 psi (pounds per square inch) or 29.92 inches of mercury (in. Hg or usually "Hg). As its name implies, vacuum bagging is a technique which creates a vacuum; an airtight barrier between the open atmosphere and the closed system. When the vacuum bag is first sealed, air pressure on both sides of the barrier equals that of atmospheric pressure. As air is removed from the closed system with a vacuum pump, pressure inside the bag decreases while the outside pressure remains at 14.7 PSI or approximately 30"Hg. A pressure differential develops between the closed system within the bag and the open atmosphere. It is this pressure differential which provides the uniform mechanical clamping force which is so desirable. Even complex shapes may be clamped at pressures approaching the 30" Hg figure of perfect vacuum.
Building a Vacuum System
 The first step in creating a successful vacuum bagging system is to select a quality vacuum pump. The pumps are typically rated by the horsepower of the motor, type of pumping mechanism (rotary vane, diaphragm, piston, etc.,) the volume of air displaced in cubic feet per minute (CFM), and the maximum attainable vacuum pressure in inches of mercury ("Hg.) It is advisable to match the bag size, desired vacuum rate, and ultimate pressure with that of the pump for best results. While a smaller pump can often attain a desired vacuum level on a large system, it will take much longer to achieve that level. Also, if a leak is present in a system which exceeds the CFM rating of the pump, even a partial vacuum will be difficult to achieve. If a pump cannot achieve full vacuum in less than five to eight minutes, the pump is probably too small. Determining the correct pump for an application is based on the square footage of the mold which it must surround. By squeezing as much air out of the bag as soon as possible before sealing the bag and applying the vacuum, the work of the pump can be greatly reduced.
Product Checklist
| Item |
Description |
|
| 0.28 HP Combination Pressure/Vacuum Pump |
This oil free vacuum pump is perfect for basic vacuum bagging applications. It is quiet, compact and portable! While it is not designed for continuous use, this pump is perfect for completing a small, quick project where vacuum is needed for less than 2 hours. |

|
| 0.3 HP Rotary Vane Vacuum Pump |
This oil free rotary vane vacuum pump is ideal for applications in small shops and universities where part sizes and shapes are constantly changing. |
|
| Industrial .56 HP Vacuum Pump |
This heavy-duty pup suits nearly any size of vacuum bagging or resin infusion application. It is designed to run continuously with very little maintenance—perfect for handling the workload in a busy shop. |
|
| Commercial 1.2 HP Rotary Vane Vacuum Pump |
At twice the horsepower and triple the CFM of our Commercial Vacuum Pump, this 100% oil free rotary vane vacuum pump is designed for heavy-duty applications and can handle multiple vacuum bagging and infusion projects simultaneously. |
|
Fitting and Connectors
Next, the pump must be connected to the bag itself. Although the configuration can be modified to suit a specific application, the basic connections are as shown in Diagram A. The pump is connected to the bag by tubing. The primary consideration in tubing selection is its ability to not collapse during vacuum. A connector between the tubing and the pump is required as well as a means of fitting the tubing into the bag. All connections must be as tight as possible to maintain the vacuum. We have selected a series of connectors which all fit properly and the remainder of this brochure will refer to our part numbers to explain the configurations. However, the principles can be applied with a variety of connectors and approaches.
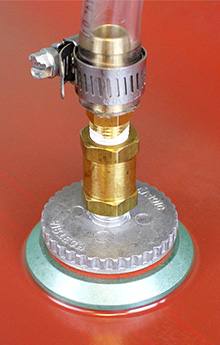
The #891-A Vacuum Coupling creates a leak-free union between the bag and the tubing. The bag is prepared for insertion of the coupling by cutting a 1/2 inch "X" into the bag itself. The Vacuum Coupling body is pressed through the film from the inside. The 1/2" cut will expand to fit the 3/4" body of the fitting, but caution must be taken to ensure that it doesn't tear further. The locknut is then threaded into position on the coupling body, and the union is complete. Any tears or gaps around the coupling must be plugged with sealant tape.
The #893 Vacuum Tubing can then be cut to fit from the pump to the vacuum coupling. This tubing fits the coupling as well as the fitting which is supplied with our pumps. If your tubing varies in size from either of these connections, you will have to modify your setup to ensure that you are not losing vacuum at either connection point.
Additional clamping at these and the following connections is usually not necessary up to 26" Hg. However, if these fittings are used at vacuum levels approaching 20" Hg, clamps may be necessary to prevent leaks.
Product Checklist
| Item |
Description |
|
| Vacuum Connector |
Using a vacuum allows for a reusable, leak-free vacuum port in basic vacuum bagging installation. |
|
| Vacuum Tubing |
When choosing your vacuum tubing, it's important that the material can hold up to the pressure associated with the vacuum cycle. |
|
Adding A Vacuum Gauge
In addition to the most basic system described above, a vacuum gauge or a vacuum gauge with a regulator may be installed in the system. The primary advantage of using a vacuum gauge is the visual detection of leaks and the knowledge that they have been eliminated. Also, an accurate record of the vacuum pressures acquired during the fabrication of the part may be documented. Accurate recorded data of the minutes elapsed at each vacuum level will help you duplicate and hone your fabrication skills.
A vacuum gauge such as our #896 may be inserted into the system in three different ways. First and most simply, the gauge may be attached directly to the pump. Second, the gauge may be attached to the pump with vacuum relief and third, the gauge may be installed directly into the bag.
Product Checklist
| Item |
Description |
|
| Vacuum Gauge |
Using a Vacuum gauge will allow you to measure and control the vacuum pressure of your vacuum bagging applications. |
|
Attaching a Vacuum Gauge to the Pump Without Pressure Relief
The gauge may be mounted directly to the pump by using a connector such as our #898-A T-Attachment Assembly. This connector is supplied with 3 components: a T-Attachment, a brass nipple to connect to the pump and a hose barb to connect with the tubing. This set-up permits the accurate measurement of the vacuum pressure throughout the entire system. There is a limitation to using only a gauge and a T-Attachment, however. Although you will be able to identify and plug leaks, you do not have any mechanism to reduce vacuum pressure. If you wish to adjust down from full vacuum, it is necessary to have a Bleedoff Valve Assembly.
Product Checklist
| Item |
Description |
|
| T-Attachment |
A T-Attachment will make your work a lot easier when setting a vacuum gauge. The durable, brass fitting is equipped with three ports. Simply screw the male-threaded fitting directly into your pump, the vacuum gauge on top and the tubing on the barbed fitted third port. |
|
Adding Vacuum Relief to the System
A Bleedoff Valve Assembly such as our #902-A would be installed instead of the T-Attachment Assembly. It is used as the connector for the Vacuum Gauge but allows you to adjust the vacuum in addition to reading the gauge. It is sometimes beneficial to apply only partial vacuum during the initial stage of the cure cycle. If full vacuum is applied before the resin begins to gel, too much resin may be pulled from the laminate. This can leave a dry, resin starved surface which would be an inherent weak spot in the finished laminate. Partial vacuum is often desirable during this early phase for proper compaction of the composite layers, but full vacuum is delayed until the thin resin section begins to gel. Excess resin will still be bled off at this point. The #902 Bleedoff Valve Assembly is intended to be threaded directly to the vacuum pump using the attached brass fitting. The nylon hose barb exits from the port directly opposite the brass inlet port and is the union for this vacuum tubing. The vacuum gauge threads into the top of the bleedoff valve assembly. Teflon tape must be employed on all threaded joints to ensure a leak-free seal.
Product Checklist
| Item |
Description |
|
| Bleedoff Valve |
This durable brass fitting gives fabricators greater control of air pressure at the source of the vacuum. The bleedoff valve is equipped to the bottom of the brass fitting, with an adjustable screw for control of airflow. |
|
Installing a Vacuum Gauge Into the Bag
The final type of gauge attachment is to the bag itself. It is often beneficial to know the vacuum pressure within an individual bag. This is also the most accurate way to measure the pressure in the bag. Some pressure is lost in the system due to frictional air resistance, and the remote gauge location records only the pressure reaching the bag. In a system employing multiple bags, gauges can measure the pressures in each one. This is especially helpful when the bags are operating at different vacuum levels. Using a #909-A Two-Way Shutoff Valve, one can also control the airflow from pump to the bag. The gauge would then indicate if a leak was present, and when the valve needed to be opened again to maintain the desired pressure. To support and seal the gauge in the bag, a #910-A Thru-Bag Vacuum Connector is needed. The connector is inserted through the bag and tightened. Teflon Tape is placed on the threads of the vacuum gauge and the gauge is threaded to the connector.
Product Checklist
| Item |
Description |
|
| Two-Way Shutoff Valve |
A Two-Way Shutoff Valve is a simple way to control the vacuum pressure on your vacuum bag, whether it is to restrict air flow or to seal the bag off completely. |
|
| Thru-Bag Vacuum Connector |
The Thru-Bag Connector allows fabricators to draw air directly from the vacuum bag with a conventional air house. The steel nipple at the end allows for quick and easy installation and can be removed to install hose bars to draw air. |
|
Multiple Bag or Multiple Port Applications
It is possible to have more than one bag at a time working from a single pump. It is also possible (although not usually necessary) to have more than one port into a single bag. In order to direct more than one piece of tubing from a single pump, a #906-A T-Fitting or #907-A Equal Angle Y Fitting is needed. The fitting is inserted between the pump and the tubing connections. Multiple vacuum couplings, gauges, etc. would complete the setup.
Product Checklist
| Item |
Description |
|
| T-Fitting |
This T-Fitting allows fabricators to draw down two bags on a single pump, or install multiple ports in a single bag. |
|
| Equal Angle Y Fitting |
With equally spaced serrated arms, a Y-fitting will use a smaller amount of space than a T-Fitting, while still allowing fabricators to draw down two bags or install multiple ports to a bag. |
|
The Vacuum Bagging Process
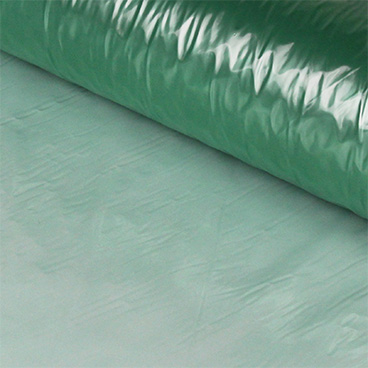
A typical wet-laminate and corresponding female mold may be placed inside a vacuum bagging assembly after certain measures have been taken to ensure its removal. First, a release film or peel-ply material must be draped over any portion in contact with the resin. Leave excess folds of loose release material in any deep or hard to reach portions of the mold to guarantee that the material will not bridge or be pulled taught across the corners. A gap would leave an air pocket below the material. If the part is too complex to have the release draped evenly, sections may be cut and applied individually to the contours. However, the layers must overlap at all joints to ensure adequate protection. The type of release layer varies depending upon the desired surface texture and resin content that the component is to have. If the inside surface is to be painted or have another layer bonded to it, a peel-ply layer would be utilized. Peel-ply will also allow excess resin to pass through it and become absorbed in the bleeder material. If a smooth, finished surface is desired, a release film should be used. Perforated release film will allow excess to pass through, while non-perforated release film holds the resin in the molded part.
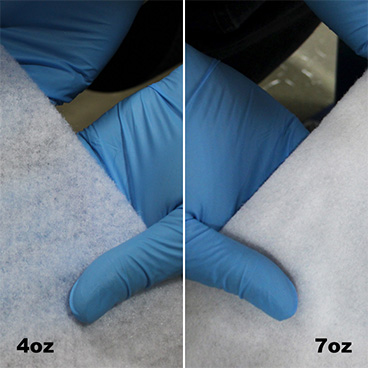
The next layer to be added is the bleeder/breather material. As its name implies, this material provides two important functions. First, it absorbs excess resin from the laminate. Second, it is this layer which ensures the vacuum is distributed evenly within the bag. By rolling or folding the breather into tight areas, the air flow within the bag can be directed to ensure that vacuum is achieved on edges opposite the pump inlet. The breather layer can also be used to apply pressure in hard to reach areas of a mold by placing rolled or folded sections deep into sharp angles or troughs. Again, it is imperative to have excess breather cloth in all tight radii, so bridging does not occur. And finally, the bleeder/breather layer must extend to the point of the vacuum couplings where a triple layer guarantees the bag union will not seal itself from the part. The vacuum bagging materials just described can be used on virtually any wet-lamination where increased pressure is desirable. However, there are three predominant ways of affixing the bag itself. Each will be described below.
Product Checklist
| Item |
Description |
|
| Release Film and Peel Ply |
Release films and peel-ply materials are draped over any portion in contact with the resin. They will help to provide a smooth, consistent surface finish for your laminate once the bagging process is complete. |
|
| Breather and Bleeder |
A Breather and bleeder material serves two purposes during the vacuum bagging process. As a breather, it allows for vacuum pressure to be applied evenly across the entire surface area of the laminate. As a bleeder, it will absorb excess resin applied during the lay-up process. |
|
Installing a Vacuum Gauge Into the Bag
First, the bag can completely surround both the mold and the laminate. If the part is small enough, it can simply be inserted into a tube type polyethylene bag, the vacuum coupling fitted, and the two ends sealed with sealant tape. If the part is too large for an existing tube type bag, you can make your own by joining two sheets of bagging film on three edges, inserting the part and vacuum coupling and then sealing the last edge. If a bag this large must be constructed, costs may warrant sealing the bag directly to the mold flange.
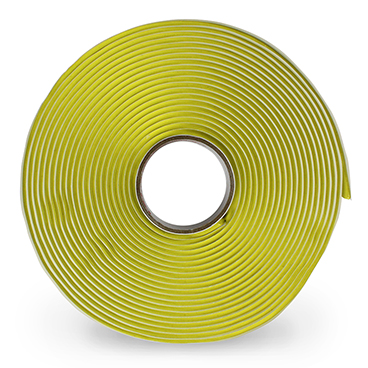
If a part is initially designed to be vacuum formed, the mold can be built to aid in the process. Essentially, a three to five inch flange may be constructed around the entire perimeter of the mold. This makes a solid base for the application of sealant tape. When sealant tape is attached to the flange of a mold, a single-sided bagging film may be employed. The other airtight barrier in this system is the mold itself. Just like the release ply and breather material, the bagging film must reach the bottom of all troughs and fully into all corners. It is this layer which actually applies the pressure from the outside atmosphere. Even when all previous layers were applied correctly, if this bagging film bridges a gap, no pressure will be applied to that area of the part. While stretchable bagging films are in production use, they are no substitute for adequate forethought and preparation of tucks and pleats in the bagging material. A tuck or a pleat is a looped gathering of bagging material where a sharp contour or edge is encountered. Sealant tape must be used to fill the loop. The pleat extends perpendicular to the path of the flange, and three to six inches of pleated material will generally give the necessary clearance.
The final form is called surface bagging. This is used when laminating on a flat board-like surface, or blending repairs on gently curved surfaces such as leading edges of aircraft wings. Quite simply, the part is assembled or repaired following the predetermined laminating schedule, and the peel-ply, and breather are added. Around the perimeter of the repair, sealant tape is affixed to the base structure with an inch overlap at all four corners. Next the 1/2" "X" is cut in the bagging film, and the vacuum coupling is inserted. The paper strip is removed from one line of the sealant tape at a time, and the bag is attached to the exposed sealant. Once the bag is in place, vacuum is applied.
A Look at the Basics
Vacuum bagging does not have to be an extremely complex process. A fabricator who would like to improve his strength-to-weight will generally find great benefit from a simple vacuum bag construction. As the process is refined, the projects become more complex or as larger parts are made, the techniques can become quite elaborate. Unfortunately, the elaborate techniques have scared a number of people away from using this helpful approach to improving their hand laminates.
We encourage you to select the right pump, to ensure that all of your components will properly fit together and to practice with some simple parts to minimize the cost of any "Learning Curve" mistakes.


