Photo credit IStock Photo.
Introduction to Composite Molds
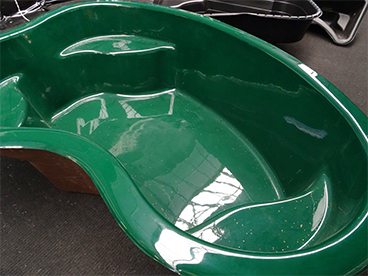 Photo credit IStock Photo.
What is "molding"? Molding has been used for years to form metal products like car body panels, home appliances, and industrial fixtures. Metal stamping dies are cumbersome and cost thousands of dollars to produce. Most often, only larger companies can afford to build, operate and maintain these tools. Composite materials offer a cost effective way for anyone to make even large production runs of identical parts in molds they can produce themselves.
Of all the advantages offered by composite materials, their ability to be molded to complex shapes is perhaps the most popular. When a shape needs to be reproduced numerous times, it is most efficient to build a tool or mold within which the part can be fabricated. Molded parts emerge perfectly shaped every time and require little post-finishing work.
Another advantage of composite molds is cost. It's far less expensive to fabricate and maintain a composite mold than to purchase a mold made of aluminum or steel.
This white paper will describe the steps necessary to create accurate, high-quality, low-distortion molds for producing composite parts, including:
- Plug Preparation
- Types of Molds
- Materials
- Mold Construction Steps
- Releasing the Mold
- Prepping the Mold for Use
This article is intended to help novice through intermediate builders obtain successful results with their first project. While many of the principles described are the same as large-scale industrial techniques, the suggestions offered are meant to be used in small shops, garages, or workshops to help individuals produce BIG results! For this reason, the examples listed are intended to be scaled-down, helpful industrial hints.
How to Create the Plug for Fiberglass Molds
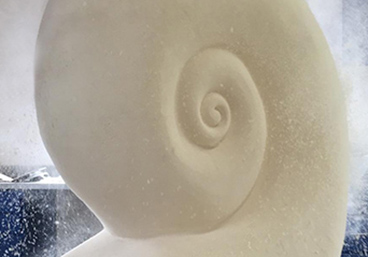 Photo credit IStock Photo.
The fiberglass mold-making process begins with an object known as the plug. The plug is an exact representation of the object to be fabricated. One of the primary keys to success in mold construction is proper preparation of the plug. Any imperfections in the plug surface will be transferred to the mold, and then to future parts made from that mold. The plug needs to have a finish AT LEAST as good as the parts you wish to produce.
When beginning the process of creating an original plug, you must first determine the type of material that will be used. Plugs can be created from a variety of materials, as long as they are dimensionally stable. These materials commonly include wood, MDF, clay, SMC, foam and balsa. If the plug is to be made from a porous material such as wood or foam, the surface must be sealed with a resin or primer. Plugs need to have a slight taper so that the mold can be easily removed. Typically, a larger plug will require more rigid and reinforced materials.
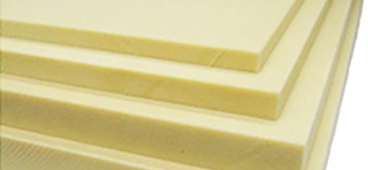
While many options exist for material selection, the most common choice for plug creation is foam. It is easily shaped, cost-effective and readily available. Fibre Glast has several options for your plug building needs including #440-C/441-C/442-C/443-C 2 Lb. Polyisocyanurate Foam Sheets, #448-D 6 Lb. Polyisocyanurate Foam Sheets, #445-A Six Foot Polyisocyanurate Foam Blocks. Polyisocyanurate foam has been a favorite material of pattern builders for years. You can cut, carve, sand, and sculpt nearly any shape. Although this foam can be easily CNC machined, it should not be hot-wired. Professional results can be achieved by using a variety of hand tools to saw, carve, plane, and smooth out your shape. Polyisocyanurate sheets can be glued together with General Purpose Spray Adhesive to form thicker blocks for shaping functional, moldless parts.
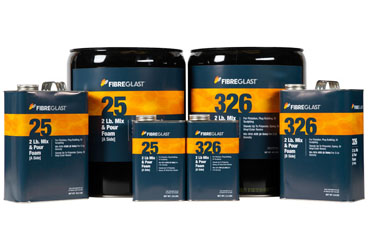
Another option for foam plug material is mix and pour foam. We offer two densities of mix and pour foams- #25/326 2 Lb. Polyurethane Mix and #625/626 6 Lb. Polyurethane Mix and Pour Foam. Unlike polyester and polystyrene foams, polyurethane foam is compatible with polyester and epoxy resin systems. Due to its small cell structure, our mix & pour foam is frequently used to make detailed plugs and sculptures.
After the plug has been properly shaped and sanded, finish the plug with a high quality surfacing primer, such as #1041 Duratec Gray Surfacing Primer. These materials can be readily sanded and polished to a Class "A" finish. For a more in-depth discussion on creating your plug, please see our Learning Center Article "Plug Construction Guide".
Types of Composite Molds
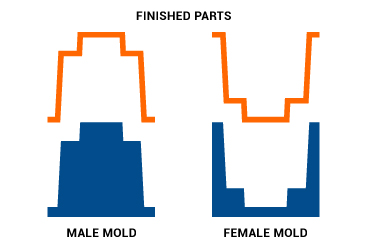 Photo credit IStock Photo.
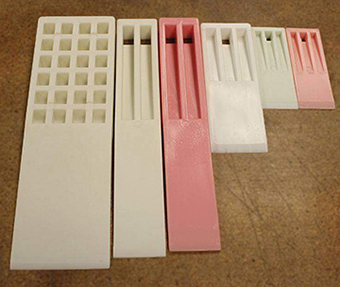
Male and female molds are the two primary types of forms, but they yield significantly different finished parts. The least time consuming and cheapest method is the male (or positive) mold. This is a form that mimics the final shape of the part by fabrication over its outer surface. It is true that this type of mold is quicker to construct, but each part produced will have a rough outer texture which requires laborious finishing. The part will also "grow" during lamination. Usually, this is undesirable, unless the mold is intentionally made slightly smaller in anticipation of this growth. Male molds should be used when fewer than 5-10 parts are being produced and should not be used when an aesthetically perfect finish is required. Larger production runs usually warrant the time and cost associated with female molds. The remainder of this white paper will deal mostly with construction of female molds, but male molds can be made using the same materials.
Female (or cavity) molds are generally more costly, but they offer numerous advantages for medium to large production runs and for applications that require a cosmetically perfect finish. Finishing time is significantly reduced because every part emerges with a smooth outer surface. Female molds also lend themselves to use with core materials because the outer skin is always smooth regardless of how inconsistently the core is used inside the part. Either type of mold can be used for vacuum bagging, but female molds are usually easier to seal while achieving good surface characteristics. If more than 5-10 parts which need a smooth finish are being produced, female molds are worth the extra effort.
Compression molds are sometimes made by using both a male and a female form. These "matched" molds are excellent for producing precision parts. The molds are loaded with reinforcement and resin before they are closed and tightened. Excess resin is squeezed out, voids are reduced, and parts emerge smooth and finished on both sides. Compression molds can also be modified for use with resin infusion or injection. The key is to think about the intended use of the finished part and what type of mold will be necessary to build it. If this is considered in advance, there is no limit to the type of parts that can be produced.
Selection of Materials
Before beginning the construction of any mold, take the time to consider the desired end results. Plan to fabricate your mold at least 5 times thicker than the parts you wish to pull from it. This will prevent warping and possible damage to your mold during the de-molding process. The construction of the mold will be a trade-off among the physical properties of the mold, cost of construction and time involved to build the mold. What you want in a finished part will have a direct bearing on these trade-offs. Careful consideration of these factors will enable you to incur the least expense to get the desired results.

When selecting mold-making materials and the method of construction, take into account such things as the length of the production run and the desired quality of the surface finish on the part. The time and materials put into the mold at the beginning will ultimately impact how many parts you can make and the quality of those parts. Other things to consider include technique specific modifications to the mold to aid in procedures like vacuum bagging and compression molding. Larger flanges are worth incorporating to make both these procedures easier. Locating pins along the perimeter flange should also be planned for complex molds with multiple pieces requiring precise alignment. Finally, consider how the mold will be held while in use. An egg-crate structure will add both support and manageability to molds with awkward shapes.
Another critical item to consider is the compatibility of materials regarding thermal expansion. Thermal expansion is the tendency of matter to change in shape, area, and volume in response to a change in temperature. When resin cures, heat is generated (exotherm). This heat causes the material to expand to a certain degree. Since fiberglass and carbon fiber have different coefficients of thermal expansion, you need keep this in mind when choosing your materials. Precision carbon fiber parts and larger carbon fiber components should be fabricated using carbon fiber molds. This will prevent the possibility of warping and distortion in your new part.
 Photo credit IStock Photo.
How you intend to release the mold from the plug (and subsequent parts from the mold) will also impact the overall design and construction. The first factor to consider is the draft angle of the mold. This is the angle of the sides of the mold compared to its base. A mold with zero draft has flat sides that are perpendicular to the bottom. On a mold with positive draft, the sides are wider at the top than they are at the base. Parts can be more easily removed from molds with positive draft. The sides of a mold with negative draft are tighter at the top than at the bottom. For obvious reasons, parts are virtually impossible to remove from a mold with negative draft. Shapes which have to be molded with negative draft must be made in multiple-piece molds. Each piece has positive draft for easy release, yet they all bolt together forming the negative cavity.
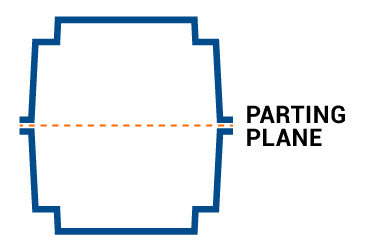 Photo credit IStock Photo.
The point where the mold pieces join together is called the parting plane. This is the imaginary line that divides the negative draft angle into two positive angles. Molds can be built with as many parting planes as needed for complete separation. The plane typically runs along the highest or widest crest of the plug. When first tackling mold building projects, it is helpful to draw the line on the plug with a felt tipped pen. This permits trial-and-error sketching until you are satisfied that it is located in the proper place. If further lessons are necessary, look at the mold seams on plastic children's toys. They are often quite exaggerated and rarely removed. A lot can be learned from these examples.
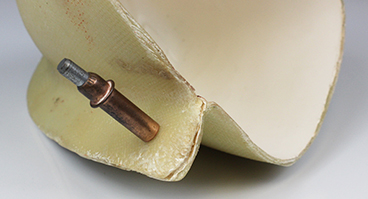
Large parts and molds have difficulty separating, even after their edges break free. Slight adhesion over broad areas and even static contributes to the problem. Expect the worst, and plan ahead. Drill holes through the mold and bond an air fitting to the back. Use clay to fill the hole during molding so resin does not contaminate the air line. When the part is ready to release, hook up the compressed air to aid in the release of the mold. Locate the fittings in areas that will later be trimmed and removed or easily sanded and repaired so the marks from the clay won't affect the cosmetics of the finished parts.
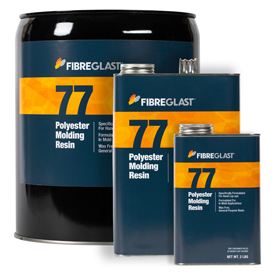
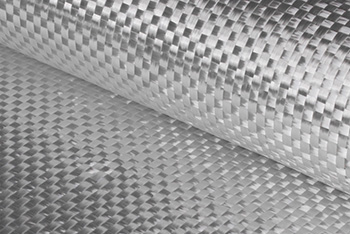
When selecting the actual resins and fabrics, approach it from the standpoint of creating a mold for the lowest possible cost, given the application. Nearly all composite materials can be utilized in mold construction, but the part requirements often don't justify the expense of more exotic materials. For many parts, a mold constructed with #77 Polyester Molding Resin and #250 Chopped Strand Mat: 1.5 ounce will produce satisfactory results. Mat offers quick build-up, along with uniform strength and stiffness, in a minimum number of layers (typically 8-10 layers.) Alternating layers of chopped strand mat and a woven fabric will increase dimensional stability and strengthen your mold.
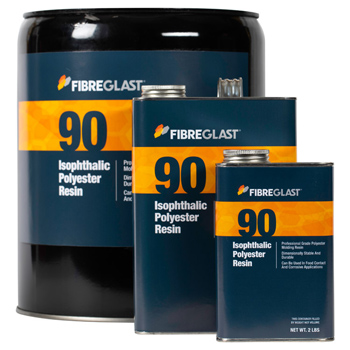
Using a good tooling gelcoat, like our #188 Orange Tooling Gel Coat, sprayed at the proper thickness, will aid greatly in achieving a Class "A" mold surface. For more dimensionally stable molds, use our #90 Isophthalic Polyester Resin. Isophthalic Polyester Resin has better strength properties and exhibits less shrink than a general purpose polyester resin, which allow it to be used in more demanding applications.

Some parts do require an extremely rigid mold for dimensional accuracy or longevity. In these instances, #1098 Epoxy Surface Coat and System 2000 Laminating Epoxy Resin, which experience little to no shrinkage, can then be justified. Molds that will see higher service temperatures should be created using appropriate high temperature materials. In these cases, System 3300 High Temp Tooling Epoxy and High Temp Epoxy Surface Coat should be used.
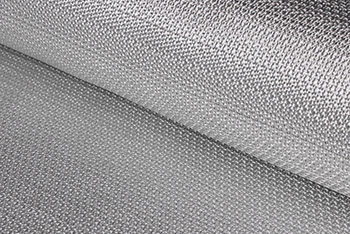
Chopped Strand Mat cannot be used with the epoxies because the binder is not compatible. We recommend the use of #245 10 oz Fiberglass Fabric (Style 7500) and #254 20 oz Tooling Fabric when fabricating molds with epoxy resin. Always begin with a lightweight surfacing fabric (2 oz or 4 oz Fiberglass Fabric), however, to minimize print-through of the heavier patterned materials. Use carbon fiber and epoxy resin for molds that need the highest strength and rigidity or for molds that will be used to create carbon fiber parts.
| Item |
Description |
|
| #241 - 2 oz Fiberglass Fabric |
This exceptionally lightweight fiberglass wets out to a transparent, protective print-through barrier, and is suited for aerospace and marine applications. |
 |
| #262 - 4 oz Fiberglass Fabric |
This fiberglass wets out to a transparent, protective barrier, and can be used to prevent print-through of heavier fabrics underneath. |
|
| #245 - 10 oz Fiberglass Fabric |
Also known as Style 7500, this is the most frequently chosen fabric for building molds. |
|
| #254 - 20 oz Fiberglass Fabric |
This fabric is typically placed at the heart of a mold to build bulk, strength, and dimensional stability. |
|
Another option for a quick, easy mold is urethane resins. Our selection of Shore A Urethanes can be used as flexible materials to create molds with negative angles. Unlike composite molds which cannot release parts with negative angles, the soft, pliable Shore A urethane can be bent back (or even cut off) for easier release. If cast in thick sections, the pliable urethanes retain enough dimensional stability to mold composite parts. Building molds with the Shore A urethanes saves significant labor and time versus building small composite molds. As molds get larger, however, fabricators choose composites for their weight, longevity, and cost efficiencies. For a more thorough discussion on urethanes for mold making, see our "Casting and Molding: Urethanes vs. Composites" Learning Center article.
Plug Preparation
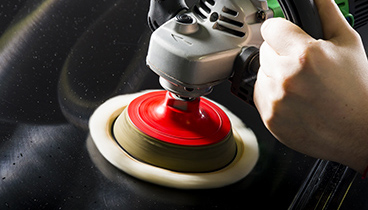 Photo credit IStock Photo.
One of the primary keys to success in mold construction is proper preparation of the plug, which is the "original" used to create the female mold. Recalling what we said earlier about beginning with the end in mind, the plug needs to have a finish AT LEAST as good as the parts you wish to produce.
The preferable surface finish for the plug and the mold would be a Class "A" finish, which means it would be a polished, high-luster finish, free from any porosity, scratches, or imperfections. In order to achieve an acceptable mold surface and a long mold life, it is far more effective to remove defects from the plug surface than to attempt to remove defects from the mold surface or from all subsequent parts created from the mold. Once the plug is refined to the surface finish desired and mold release has been applied, it is time to begin constructing the fiberglass mold. For a guide to building your plug, please see our Learning Center Articles "Plug Construction Guide" and "Plug Surface Preparation and Mold Surface Maintenance".
Release Agents
Once the plug has been prepared to a Class "A" finish, construction of the female mold can commence. First, a mold release agent will need to be applied to the plug. This is a critical step, since it will allow you to separate the mold from the plug once the materials used to construct the mold have cured. If the mold doesn't release properly from the plug, the mold and the plug could be damaged or destroyed, so follow these procedures carefully.
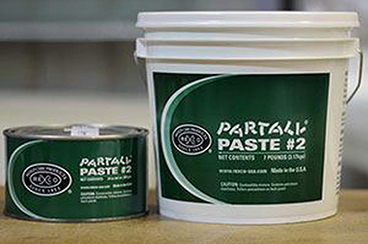
The most common release agents employed are the traditional combination of #1016 Parting Wax and #13 PVA Release Film. When working with parting wax and PVA, follow these steps for the best opportunity for success:
- Use a clean dry cloth or applicator pad to apply a thin even coat of Parting Wax to mold surface.
- If buffing by hand, apply to small section and begin buffing within one minute of application. A power buffer equipped with a terry cloth or lamb's wool pad will reduce labor time on larger surfaces. Keep power buffer moving constantly so as not to allow build-up of friction that could burn through the wax coating. Surface should be buffed to a glossy finish.
- In order to insure complete coverage, repeat application and polishing process at least three times when initializing new or reconditioned plugs.
- Allow one hour for solvents to evaporate, producing a tougher wax barrier.
After the final application has dried and been buffed, the PVA can be applied to the plug. For best results, follow these steps:
- PVA can be brushed on, but for best results, apply with a spray gun, 12–18 inches away from substrate.
- Generally, apply in three layers: the first, a thin mist, allowing 10-15 minutes to dry completely. Then apply two heavier flow coats, allowing each to dry completely (30-45 minutes each).
- PVA should form a smooth, glossy surface that will not shrink or pull away from corners or curved surfaces.
- It may be applied over polyester repairs, or gel coat, as a surface layer for airless tack-free cure.
Before starting the lay-up of the mold, parting flanges or dams must be added to the plug along all the parting planes previously described. This is the form that divides the mold segments during construction. This form is removed once one side has been molded. Like the plug itself, these parting flanges are constructed of the least expensive materials that will support the curing fiberglass later. Clay, Masonite, waxed poster board, thin sheet metal, and playing cards have all been known to work. Typically, a "snake" of clay is rolled in the palm of the hands and pressed onto the plug along the parting plane. When the symmetry is simple, a silhouette cut-out can be made from Masonite and attached with the clay. It is easier to use the poster board, or playing cards on plugs with complicated shapes. Scissors can quickly cut the contours necessary before the dam is inserted into the clay. Use a mixing stick to scrape away the excess clay on the side that will be molded first. More elaborate fixtures can be constructed to do the same job, however this method will provide repeatable results.
At this point, any locating keys or dowels for re-aligning the segments of a multiple-piece mold should be added to the parting flange. If the flange is made of clay, these key-ways can simply be imbedded in the soft material. Masonite is also easy to add to them to because it provides plenty of support for holding the dowels. When using a paper or metal dam, simply make a key from clay and stick it to the surface. The key-way will be molded first, then remove the clay and the other mold section will be made with the matching key. Regardless of the material used to make the parting dam, spray or gently wipe on one final coat of release agent.
Gel Coat Application
 Photo credit IStock Photo.
Once these steps have been completed, it's time to begin applying the surface coat. Tooling Gel Coat is an abrasion resistant gel coat for making molds where gloss retention, superior hardness, exceptional craze resistance and minimum distortion are paramount. Our #188 Orange Tooling Gel Coat and our #186 Black Tooling Gel Coat are ideal for mold making applications. Although the surface coat can be applied with a brush, a more uniform result will be achieved by spraying it. Gel coats and other surface coat materials are too thick to be sprayed with normal automotive spray equipment, so a special gravity-fed Gel Coat Cup Gun (#120) must be utilized. Typically, cup guns accept disposable cups holding up to a quart of material. After mixing the proper amount of catalyst, you're ready to spray the surface coat. Once you start spraying, keep the material flowing; don't start and stop at the end of each pass like when spraying paint through regular siphon equipment. Exercise caution, though, or too much material will build up too quickly. Using a #122-A Gel Coat Thickness Gauge for testing, apply a uniform thickness of 20-25 mils over the plug. This is best achieved in three passes of 7-8 mils each. DO NOT allow any initial passes to tack-up before adding the next layer. All mils must cure as a single film for best results. Epoxy surface coats can be brushed on, and if mixed correctly are trouble free.
| Item |
Description |
|
| #188 - Orange Tooling Gel Coat |
This tooling gel coat creates an abrasion resistant coating for molds with excellent glossy retention and hardness. |
|
| #186 - Black Tooling Gel Coat |
This tooling gel coat creates an abrasion resistant coating for molds with excellent glossy retention and hardness. |
|
| #120 - Gel Coat Cup Gun |
A quick and easy to use Gel Coat gun used in producing small-to-medium sized parts. |
|
| #122 - Gel Coat Thickness Gauge |
A simple and accurate way to determine the thickness of your gel coat. |
|
Once the surface coat has been applied, it's critical to stabilize it with the first layer of reinforcement. This will help prevent the surface coat from shrinking or lifting off of the surface of the plug. The first layer of reinforcement is also the most critical layer in the mold to lay down without trapping air bubbles. All air pockets directly beneath the surface coat are prone to cracking. When the chips fall out after producing a part or two, the whole mold surface will become cratered and need resurfacing.
This process also helps prevent heat distortion in polyester molds. After an hour, the gel coat is cool to the touch. Begin by applying a layer of lightweight surfacing fabric. Surfacing fabrics serve to stabilize the gel coat on the plug and help prevent print through of the heavier reinforcing fabrics used for the structure of the mold. One layer of #262 4 oz Fiberglass Fabric and #77 Polyester Molding Resin will heat slightly while curing, but not enough to distort the delicate surface coat. When the first reinforcement layer is cool to the touch, it can be sanded in preparation for more material. The remaining layers can be added fairly quickly to this stabilized surface without much fear of thermal distortion.
Applying the Structural Material
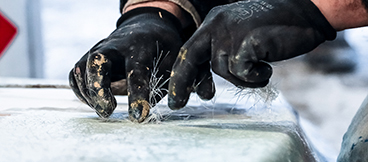 Photo credit IStock Photo.
If chopped strand mat is used, tear (don't cut) the mat into manageable chunks. The frayed edges blend well with one another without trapping air like sharp scissor-cut edges do. The flange areas will need some strips cut to the proper width to conform to the corner of the parting dam. This is probably the only area where they are needed, however. If coarse woven fabrics are used, they will lay easier over severe contours when they are cut off the roll on a 45-degree bias. Pre-cut much of the reinforcement so that 2-3 layers can be added at a time before the resin starts to gel.

Using a natural bristle brush, pre-wet the surface with properly catalyzed resin, then place the mat on the plug. The reinforcement will soak up much of the resin. Use your brush to add resin to any areas exhibiting dry spots in your material. Once again, begin by putting pre-cut strips into the angles where the parting dam meets the plug. Then apply frayed patches on the main surface, overlapping onto the flange. A milled glass putty can also be spread into those types of corners to keep out air.
Roll the air out of the laminate and compact the material to the plug surface at least every other layer. Begin by using a #1105 Bristle Roller which will pop many bubbles within the mat. Next, switch to a serrated saturation roller to compact the laminate. Be sure to use a roller that contacts the entire surface. There are many shapes and sizes to choose from for this application.
Most molds using chopped strand mat utilize about 8-10 layers. Heavier fabrics such as #223 Woven Roving or 20 oz. Tooling Fabric can be added after the third layer of mat to more rapidly increase the build-up and strength of the mold. Using woven fabrics, like our 10 oz or 7-1/2 oz Fiberglass Fabrics increase the physical properties of the mold. Consider alternating the fabric weave patterns between 0/90 and 45/45 degrees so the strength remains uniform. Do not apply more than 3-4 layers at a time so that heat generation, or exotherm, is kept to a minimum.
For larger molds requiring greater strength, rigidity and thickness, consider using sandwich core materials. Foam sheets are the most common sandwich core materials used in mold construction. Foam sandwich core will allow you to build thicker, more rigid molds without adding significant weight and material to your project. Sandwich core materials are discussed in more detail in the Learning Center article "Guidelines for Sandwich Core Materials."
Due to its improved physical properties, corrosion resistance, and water resistance, isophthalic polyester resin is often chosen for molds where dimensional stability and mechanical properties are critical. Our #90 Isophthalic Polyester Resin exhibits less shrink and produces stronger, more durable molds than the standard general molding resins. This resin is recommended for thicker molds and molds that will require extended lives with fabrication of multiple parts.
Once all of the layers are in place and have properly cured, the parting dam can be stripped off the back of the new flange and discarded. Use clean rags to wipe away any excess clay that might remain on the surface. Take care not to scratch the plug while doing this. Apply fresh mold release agent to the newly exposed flange, as this will be the form against which its mate will be constructed. Once again, follow the sequence described above from surface coat to final reinforcement until all the segments of the mold have been built.
If egg crate support structures need to be added, now is the time. Most are made from plywood or some other inexpensive flat stock. Make paper templates of the mold contour where the panel is to attach so miss-cuts are reduced. Cut the wood to shape so it fits well against the mold and any other pieces of the framework itself. Use the resin and reinforcement to bond it to the back of the mold. Join all other similar pieces to the mold in the same way, and attach them to each other as designed. Once cured, this will add even greater rigidity to the mold.
When all the portions are complete and cured, it is time to trim the mold and drill any final clamping holes for bolts. Drill the holes first so that if any part of the mold pre-releases while trimming, everything will still line up later. Trimming is actually best achieved with a saw. Grit edge jig saw blades cut faster and with less effort than most air die grinders. With the perimeter entirely trimmed, construction is complete.
Releasing the Mold from the Plug
Once the mold has completely cured (24-48 hours), it is time for the moment of truth – releasing the mold from the plug! Release wedges can be used to help coax the mold off the plug. Fibre Glast offers various sizes of release wedges with differing rigidity. These plastic wedges should be used in place of screwdrivers and putty knives because they will not chip the mold surface. Insert the wedges around the perimeter of the mold and gently tap them into place, progressing evenly around the mold. Special air-injection release wedges (#958-A), which attach to an air compressor, can also be used for stubborn parts. The pillow of air that is shot between the plug and the mold provides pressure where no wedge can reach. If a fitting was installed in the plug for compressed air use, attach the air line and gently introduce forced air between the plug and the mold. Slowly, the two should separate. If problems still persist, light blows with a rubber mallet can send vibrations through the mold causing separation. Use caution, however, because heavy pounding can fracture the mold. These combined hints will safely release the mold sections.
Preparing the Mold for Use
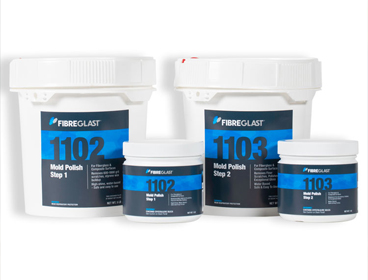
Once the mold is separated from the plug, clean and inspect its surface. The residue of PVA Mold Release agent can be washed off with warm water. Dry the surface, and look for any serious defects. Critical problems will have to be ground out and resurfaced. Hinges, air injection ports, and any other accessories should be attached at this time if they are needed. If the directions were followed and nothing was damaged during release, the surface should already be very smooth. Typically, the mold release agents leave a slight texture behind, but this can be quickly removed while achieving a class "A" surface. Begin by wet sanding with 400 grit sandpaper, eventually moving to 600 grit, then 1000 grit paper. Rinse the bucket and the mold surface before moving to the next grade of paper, so any remaining grit from the previous sandpaper is removed. Once the sanding is completed, buff the mold surface with a polishing compound like our #1102-A and #1103-A Step 1 and 2 Mold Polish for best results. For more detailed information on mold surface preparation and maintenance, see our white paper "Plug Surface Preparation and Mold Surface Maintenance".
Conclusion
Congratulations are in order for all those who made it this far. You are now prepared to embark on projects that can truly open the doors to new creations. By following these simple instructions, accurate, high quality, distortion-free molds can be constructed for fabricating quality composite parts. This information, combined with a bright idea, offers the freedom to build structures many would consider impossible. Hopefully, this white paper has instilled enough confidence and enthusiasm to get you started on your first project. As always, if you have further questions regarding the process or products, please call any of our knowledgeable staff at 800-838-8984.